
InstaGenie: Building Your Own AI Image Artist Telegram Bot with n8n
Ever dreamed of having a personal AI artist at your beck and call? Imagine this: you message your Telegram bot, “Create a professional headshot of a person in a library setting,” and poof, a stunning, realistic image appears! Or, you spot a fantastic dress on a Pinterest board or an e-commerce site, share the image to your bot, and instantly see yourself (or a model) wearing a similar outfit. With InstaGenie, that dream becomes reality.
This guide will walk you through building “InstaGenie,” a Telegram bot powered by cutting-edge AI, that turns your text descriptions and image inspirations into custom-generated images. We’ll leverage the power of n8n, a visual workflow automation tool, making the process surprisingly accessible even if you’re not a coding wizard.
What Can InstaGenie Do?
InstaGenie is more than just a simple image generator. It’s designed to be your versatile AI art companion, capable of:
- Text-to-Image Generation: Describe the image you want, and InstaGenie will create it. Examples:
- “A majestic lion standing on a savanna at sunset.”
- “A futuristic cityscape with flying cars and neon lights.”
- “A cute, fluffy kitten playing with a ball of yarn.”
- “Headshot of handsome young man, ,wearing (black leather and white tshirt), rectangular-framed glasses with dark rims, tousled black hair that’s slightly messy on top, smiling look on his face, grey background, soft studio lighting, portrait photography.”
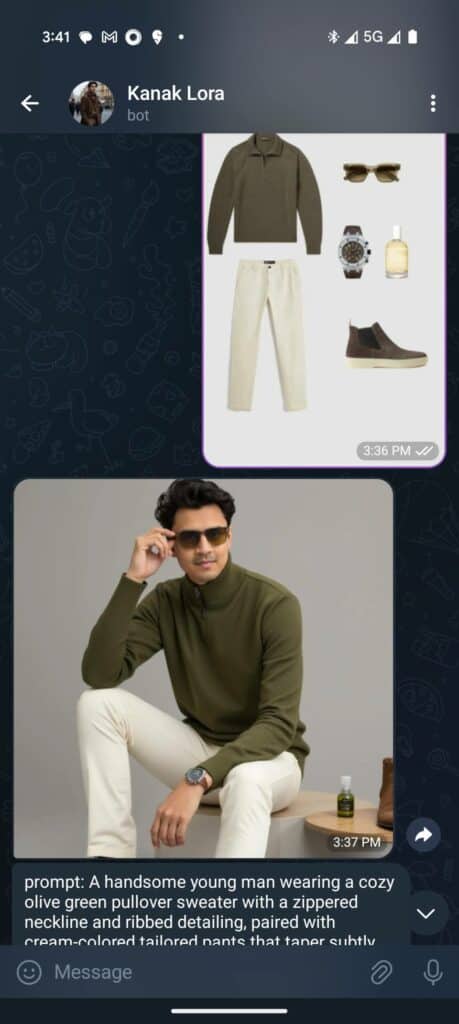
- Image-to-Image Transformation (Outfit Swapping): Find an outfit you love online? Share the image with InstaGenie, and it can generate an image of you (or a generic model) wearing a similar outfit. This is fantastic for:
- Virtual Try-On: See how a particular style might look on you before buying.
- Outfit Inspiration: Get ideas for new looks based on images you find.
- Creative Content: Generate unique images for social media or personal projects.


- Customization: Adjust image generation parameters like:
- Style: Influence the artistic style (e.g., photorealistic, painterly, anime). This is primarily controlled by the LoRA you choose (more on that later).
- Resolution: Control the image’s width and height.
- Steps: Adjust the number of diffusion steps (more steps often lead to higher quality, but take longer).
- Guidance Scale: Fine-tune how closely the generated image adheres to your prompt.
- Voice Input: Just record and send a voice note. InstaGenie will transcribe it and create image.
- Bot Configuration: Change the configuration of the bot by sending messages. Example, I want the image width to 512.
The Vision: A Telegram Bot That Creates Images
Our core goal is simple:
- User Interaction: Users message our Telegram bot with text descriptions or images.
- AI Magic: The bot uses an AI image generation model (Flux, enhanced with LoRA) to create the image.
- Delivery: The bot sends the generated image back to the user in Telegram.
- Configurability: Users can adjust parameters through bot commands.
- Voice and Image input: User can use voice or image as input.
- Error Handling: Bot will reply generic message when encounter issue.
The Tools: n8n, Telegram, Replicate, and Supabase
We’ll be using:
- n8n (n8n.io): Our visual workflow automation platform.
- Telegram API: For bot creation and interaction.
- Replicate API: Provides access to the Flux image generation model and LoRA support.
- Supabase: A backend-as-a-service (BaaS) for storing user configurations.
Prerequisites:
Before we start:
- A Telegram Account:
- n8n Instance: Self-hosted (recommended) or n8n Cloud.
- Replicate Account: Sign up and get your API key. Add credits.
- Supabase Account: Create a free account and a project.
- OpenAI Account: Create a free account.
- Basic understanding of JSON.
- (Optional) Custom LoRA: Or, find a pre-trained LoRA online.
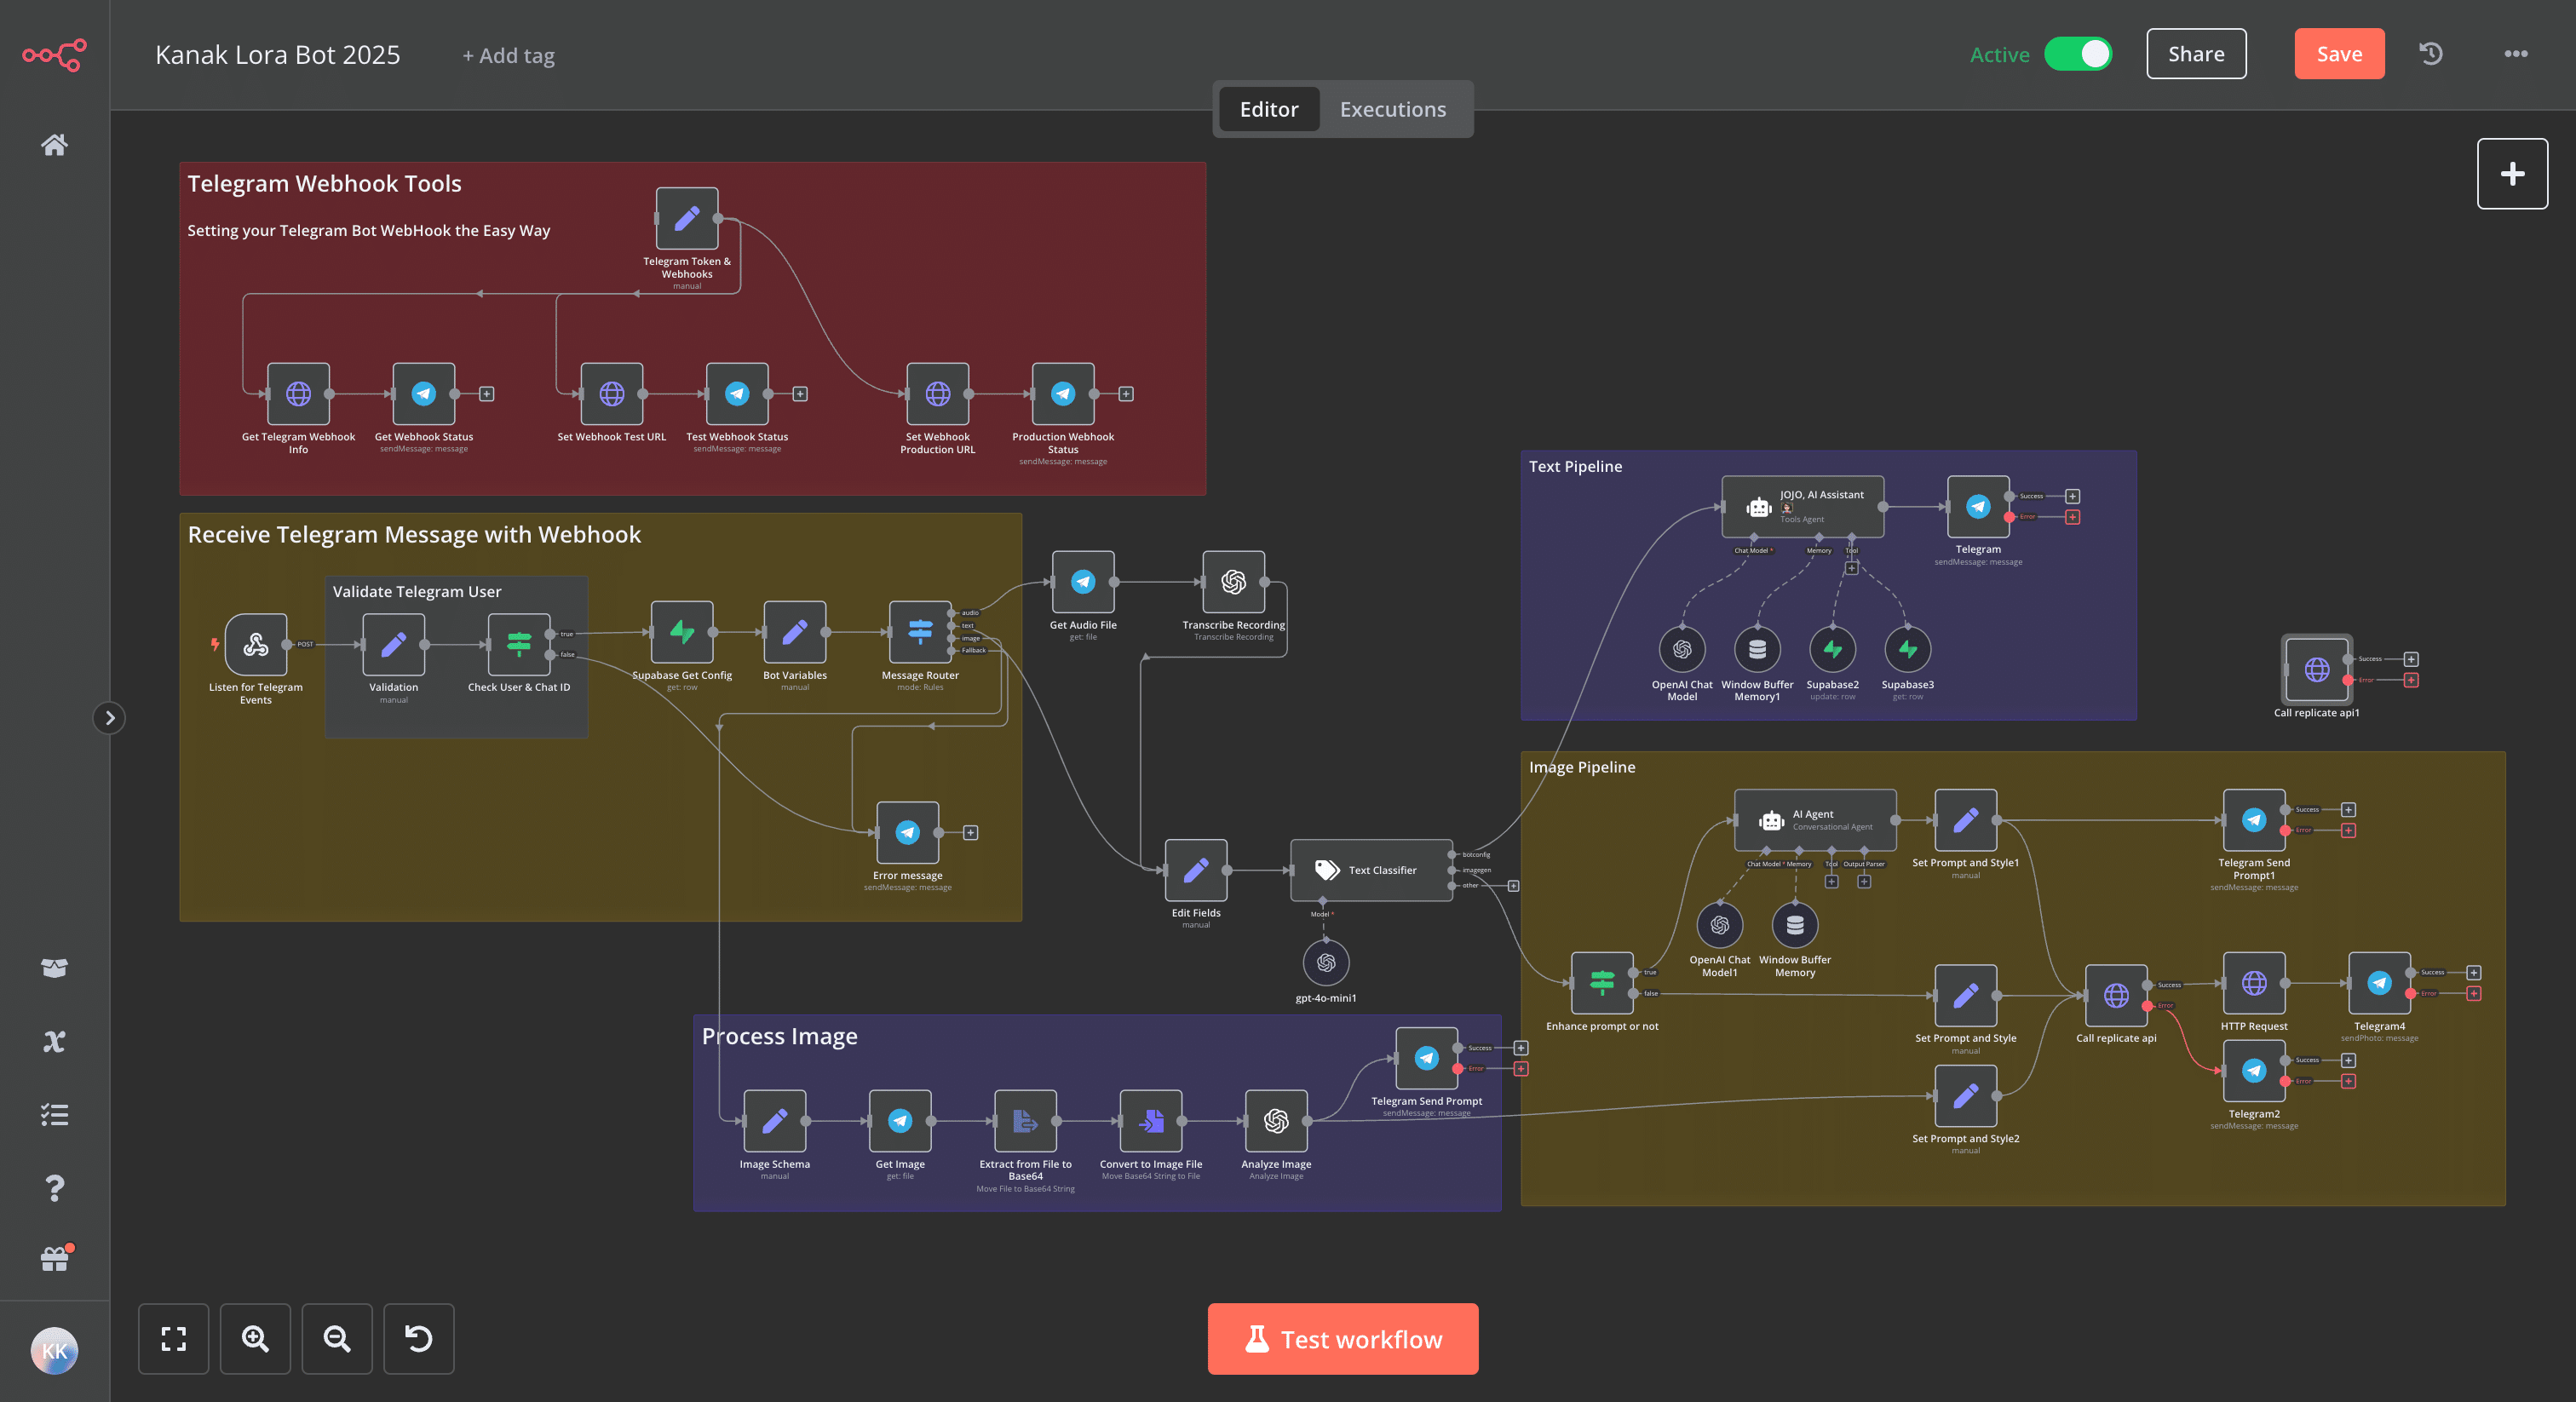
The Workflow:
Step 1: Setting up Telegram Bot and Webhook
- Create a Telegram Bot:
- In Telegram, search for “@BotFather”.
/newbotto create a bot. Follow the instructions.- Keep the bot token secret!
- Configure n8n Webhook:
- In n8n, create a new workflow.
- Add a “Webhook” node.
POSTmethod,Noneauthentication.- Give the “Path” a unique name (e.g.,
my-instagenie-bot). - Copy the “Test URL” and “Production URL”.
- Connect Telegram to Webhook URLS:
- Add a
Setnode to your workflow - Add
tokenandtest_url,production_urlin your Set node. Use your Bot Token and n8n webhook URL here. - Create 2
HTTP Requestnodes. One to set the Test URL, one to set your Production URL.URL:=https://api.telegram.org/{{ $json.token }}/setWebhookQuery Parameters:- Name: url
- Value (test):
={{ $json.test_url }} - Value (production):
={{ $json.production_url }}
- Create 1
HTTP Requestnodes.URL:=https://api.telegram.org/{{ $json.token }}/getWebhookInfo- This helps to debug if webhooks are properly configured.
- Add a
- Test Telegram Connection
- Create 2
Telegramnodes. - In the “Chat ID”, enter your own Telegram Chat ID. You can know it by sending a message to your created bot and see the
Listen to Telegram Eventsnode. - Connect to the output of the webhook configure nodes to test the connection.
- Create 2
Step 2: Setting up Supabase (Database)
- Create a Supabase Project:
- Log in to Supabase and create a new project.
- Create a Table:
- Go to the “Table Editor”.
- Create a table named
kanaklora(or your choice). - Columns:
id(int8, primary key, auto-incrementing),userid(text),memkey(text),memvalue(jsonb).
- Get Supabase Credentials:
- “Settings” > “API”.
- You’ll need your “Project URL” and your “anon” (public) key. Keep the “service_role” key secret!
Step 3: Building the n8n Workflow
- Listen for Telegram Events and Validation
- Add the
Listen to Telegram Eventsnode and connect with previous nodes. - Add a
Setnode named “Validation” - Add a
Ifnode namedCheck User & Chat ID - Add a
Telegramnode named “Error message” - Connect it as explained in Part 1 of previous section.
- Add your own
Telegram Chat IDin the “IF” node to validate incoming message.
- Add the
- Supabase Configuration Retrieval
- Add a
SupabaseNode named “Supabase Get Config”. - Add your “Supabase account” credential.
- Select
getoperation. - Select table
kanaklora - Add filters to get config for the incoming user.
- Add a
- Bot Variables (Set Node):
- Create a “Set” node named
Bot Variables. - Add fields like
enhance_img_prompt,cfg_scale,steps,width,height, andlora_scale. - Pull values from Supabase using expressions.
- Create a “Set” node named
- Message Router (Switch Node):
- Add a “Switch” node named
Message Router. - Branches: “audio”, “text”, and “image”.
- Configure as explained in the earlier section.
- Set “Fallback Output” to “extra”. Create output named “extra”
- Connect to the output of previous node.
- Add a “Switch” node named
- Audio Processing Branch:
- Get Audio File (Telegram Node): Get the audio file.
- Transcribe Recording (OpenAI Node): Use OpenAI “Transcribe Audio”.
- Text Processing Branch:
- Edit Fields (Set Node): Extract the
textproperty. - Text Classifier (Langchain Text Classifier Node): Use “Categorize Text”. Categories:
botconfig,imagegen,other. - Connect the output to
AI Assistant 👩🏻🏫andEnhance prompt or not
- Edit Fields (Set Node): Extract the
- Image Processing Branch:
- Image Schema (Set Node): Extract
file_idandcaption. - Get Image (Telegram Node): Download the image.
- Move Binary Data (Move Binary Data Node): Convert data.
- Analyze Image (OpenAI Node): Use OpenAI “Analyze Image”. Provide instructions.
- Image Schema (Set Node): Extract
- AI Assistant (for Bot Config and General Queries):
- Window Buffer Memory (Langchain Buffer Window Memory Node): Conversational memory. Use Telegram ID as
sessionKey. - OpenAI Chat Model (Langchain Chat OpenAI Node): Your main AI model.
- Supabase2 (Supabase Tool Node): Update botconfig.
- Supabase3 (Supabase Tool Node): Retrieve botconfig.
- AI Assistant 👩🏻🏫 (Langchain Agent Node): The main agent. “Conversational Agent.” Define its persona with a system message. Connect to
Supabase2andSupabase3tool nodes. - Telegram (Telegram Node): Send the AI’s response.
- Window Buffer Memory (Langchain Buffer Window Memory Node): Conversational memory. Use Telegram ID as
- Image Generation Pipeline:
- Enhance prompt or not (IF Node): Check
enhance_img_prompt. - AI Agent (Langchain Agent Node): If enhancing, refine the prompt.
- Set Prompt and Style (Set Node): Prepare
promptandstyle. - Call Replicate API (HTTP Request Node):
Method:POSTURL:https://api.replicate.com/v1/predictionsAuthentication: “Generic Credential Type” -> “HTTP Header Auth”. Replicate API key.Headers:Content-Type: application/json,Prefer: waitBody: See “Using Replicate, Flux, and LoRA” below.
- HTTP Request (HTTP Request Node): Download the image.
- Telegram (Telegram Node): Send the image back.
- Enhance prompt or not (IF Node): Check
Using Replicate, Flux, and LoRA
- What is Flux? A flexible, open-source image generation model on Replicate. A base model for fine-tuning.
- What is a LoRA? LoRA (Low-Rank Adaptation) efficiently fine-tunes large models like Flux. Adds small, trainable “adapters” to customize style or teach specific subjects without modifying the core model.
- Custom or Pre-trained LoRA:
- Custom LoRA: Train your own (many online tutorials, this one is a https://www.pelayoarbues.com/notes/Training-a-Personal-LoRA-on-Replicate-Using-FLUX.1-dev). Host it (e.g., Hugging Face Hub). Replace
huggingface.co/kanakjr/nov_lorawith your LoRA URL. - Pre-trained LoRA: Find LoRAs on sites like CivitAI (https://civitai.com/). Use their URL.
- Custom LoRA: Train your own (many online tutorials, this one is a https://www.pelayoarbues.com/notes/Training-a-Personal-LoRA-on-Replicate-Using-FLUX.1-dev). Host it (e.g., Hugging Face Hub). Replace
- The Replicate API Call (HTTP Request Node Body):
{
"version": "091495765fa5ef2725a175a57b276ec30dc9d39c22d30410f2ede68a3eab66b3", // Replace with the specific version of the Flux model you want to use.
"input": {
"prompt": "{{ $json.prompt }}", // The user's prompt (or the enhanced prompt).
"hf_lora": "kanakjr/nov_lora", // REPLACE with your LoRA URL. Or remove this line for no LoRA.
"lora_scale": {{ $('Bot Variables').item.json.lora_scale }}, // Strength of the LoRA (0.0 to 1.0).
"num_outputs": 1,
"aspect_ratio": "1:1",
"output_format": "webp",
"guidance_scale": {{ $('Bot Variables').item.json.cfg_scale }},
"output_quality": 80,
"prompt_strength": 0.8,
"num_inference_steps": {{ $('Bot Variables').item.json.steps }}
}
}
You’ve done it! Your very own AI image artist, ready to bring your imagination to life. Start experimenting with prompts, explore different LoRAs, and have fun creating amazing images with InstaGenie!