
There is a big difference between knowing how something works in theory and figuring it out with your hands.
When a brand new Bambu Lab A1 landed on my desk, I did what every excited maker does on day one: I printed the obligatory 3DBenchy boat. Watching the extruder zip across the textured plate and build a physical object out of molten filament felt like straight-up wizardry. But as soon as that little boat cooled down, a nagging realization kicked in:
Am I just going to print cute plastic trinkets that clutter my desk, or can this tool genuinely change how my space works?
As a software engineer and hardware tinkerer, my workspace was perpetually under siege. Hex keys, flush cutters, calipers, precision tweezers, rolls of tape, USB adapters, and hobby knives were scattered across every corner of the table. I needed a vertical storage system. But traditional options felt fundamentally broken:
- Pegboards (IKEA Skadis, etc.): You are locked into fixed metal or fiberboard dimensions, the hooks wobble whenever you pull a tool, and you have to keep buying proprietary metal brackets.
- French Cleats: Gorgeous for a woodworking barn, but overkill and too bulky for an apartment office wall.
Then I stumbled into the rabbit hole of Multiboard — the open-source modular organization ecosystem created by Jonathan from Keep Making.
One look at the geometry and I knew: This had to be my first big 3D printing project.
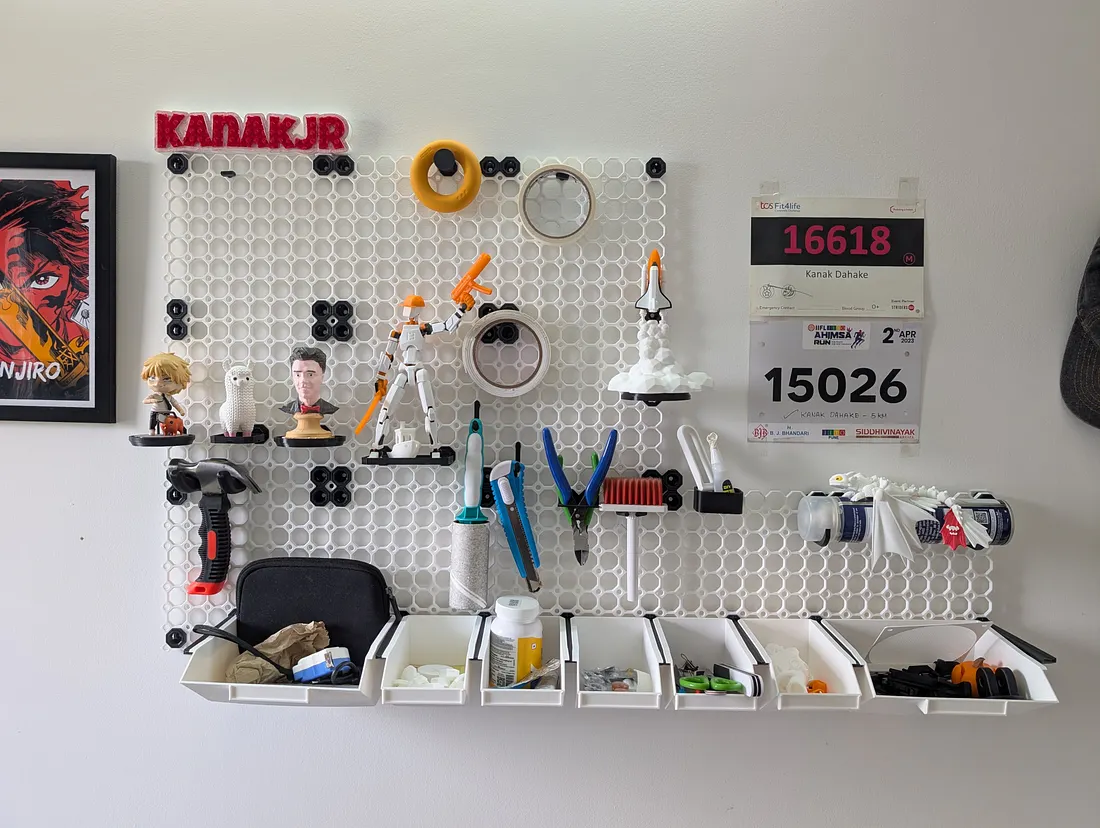
The completed wall: 3D printed core tiles, interlocking parts bins, custom tool holsters, and shelves for my favorite prints.
What Makes Multiboard Genius?
If you haven’t seen Multiboard before, imagine taking a classic pegboard, cross-breeding it with honeycomb structural infill, and optimizing every millimeter specifically for FDM 3D printing.
Instead of plain round holes, Multiboard uses a hybrid octagonal-hexagonal grid:
- Octagonal Peg Pockets: Every cell accepts push-fit accessory pegs, friction snaps, and drop-in bins.
- Interlocking Snap Channels: The corners of each tile lock together using Dual Snaps and Quad Snaps that create an ultra-rigid joint without requiring glue or metal backplates.
- Threaded Bolt Compatibility: You can screw threaded bolts directly into the cells or pass T-bolts through the front for heavy-duty hanging.
It is completely free, open-source, and infinitely expandable. You can start with a 2×2 grid and grow it over time as your tool collection expands.
[!NOTE] When you first open the Multiboard library, the sheer number of parts can be overwhelming — Core tiles, Corner tiles, Side tiles, Lite tiles, Weight-bearing snaps, Mid-thread snaps, T-bolts, and Offset brackets. The golden rule is: download the official Demo Pack first, print one tile and two snaps, and test the fit before batch-printing your whole wall.
Act I: Printing the First Core Tiles
The journey started on the Bambu Lab A1. I chose crisp white PLA for the core tiles to keep the wall bright and clean.
Here is the overhead CCTV camera capturing the Bambu A1 printing one of the 8×8 core tiles at full print speed:
Overhead CCTV timelapse: Bambu Lab A1 laying down the octagonal honeycomb grid with crisp bridges and zero warping.
Seeing the first tile come off the textured PEI plate was an unforgettable milestone:
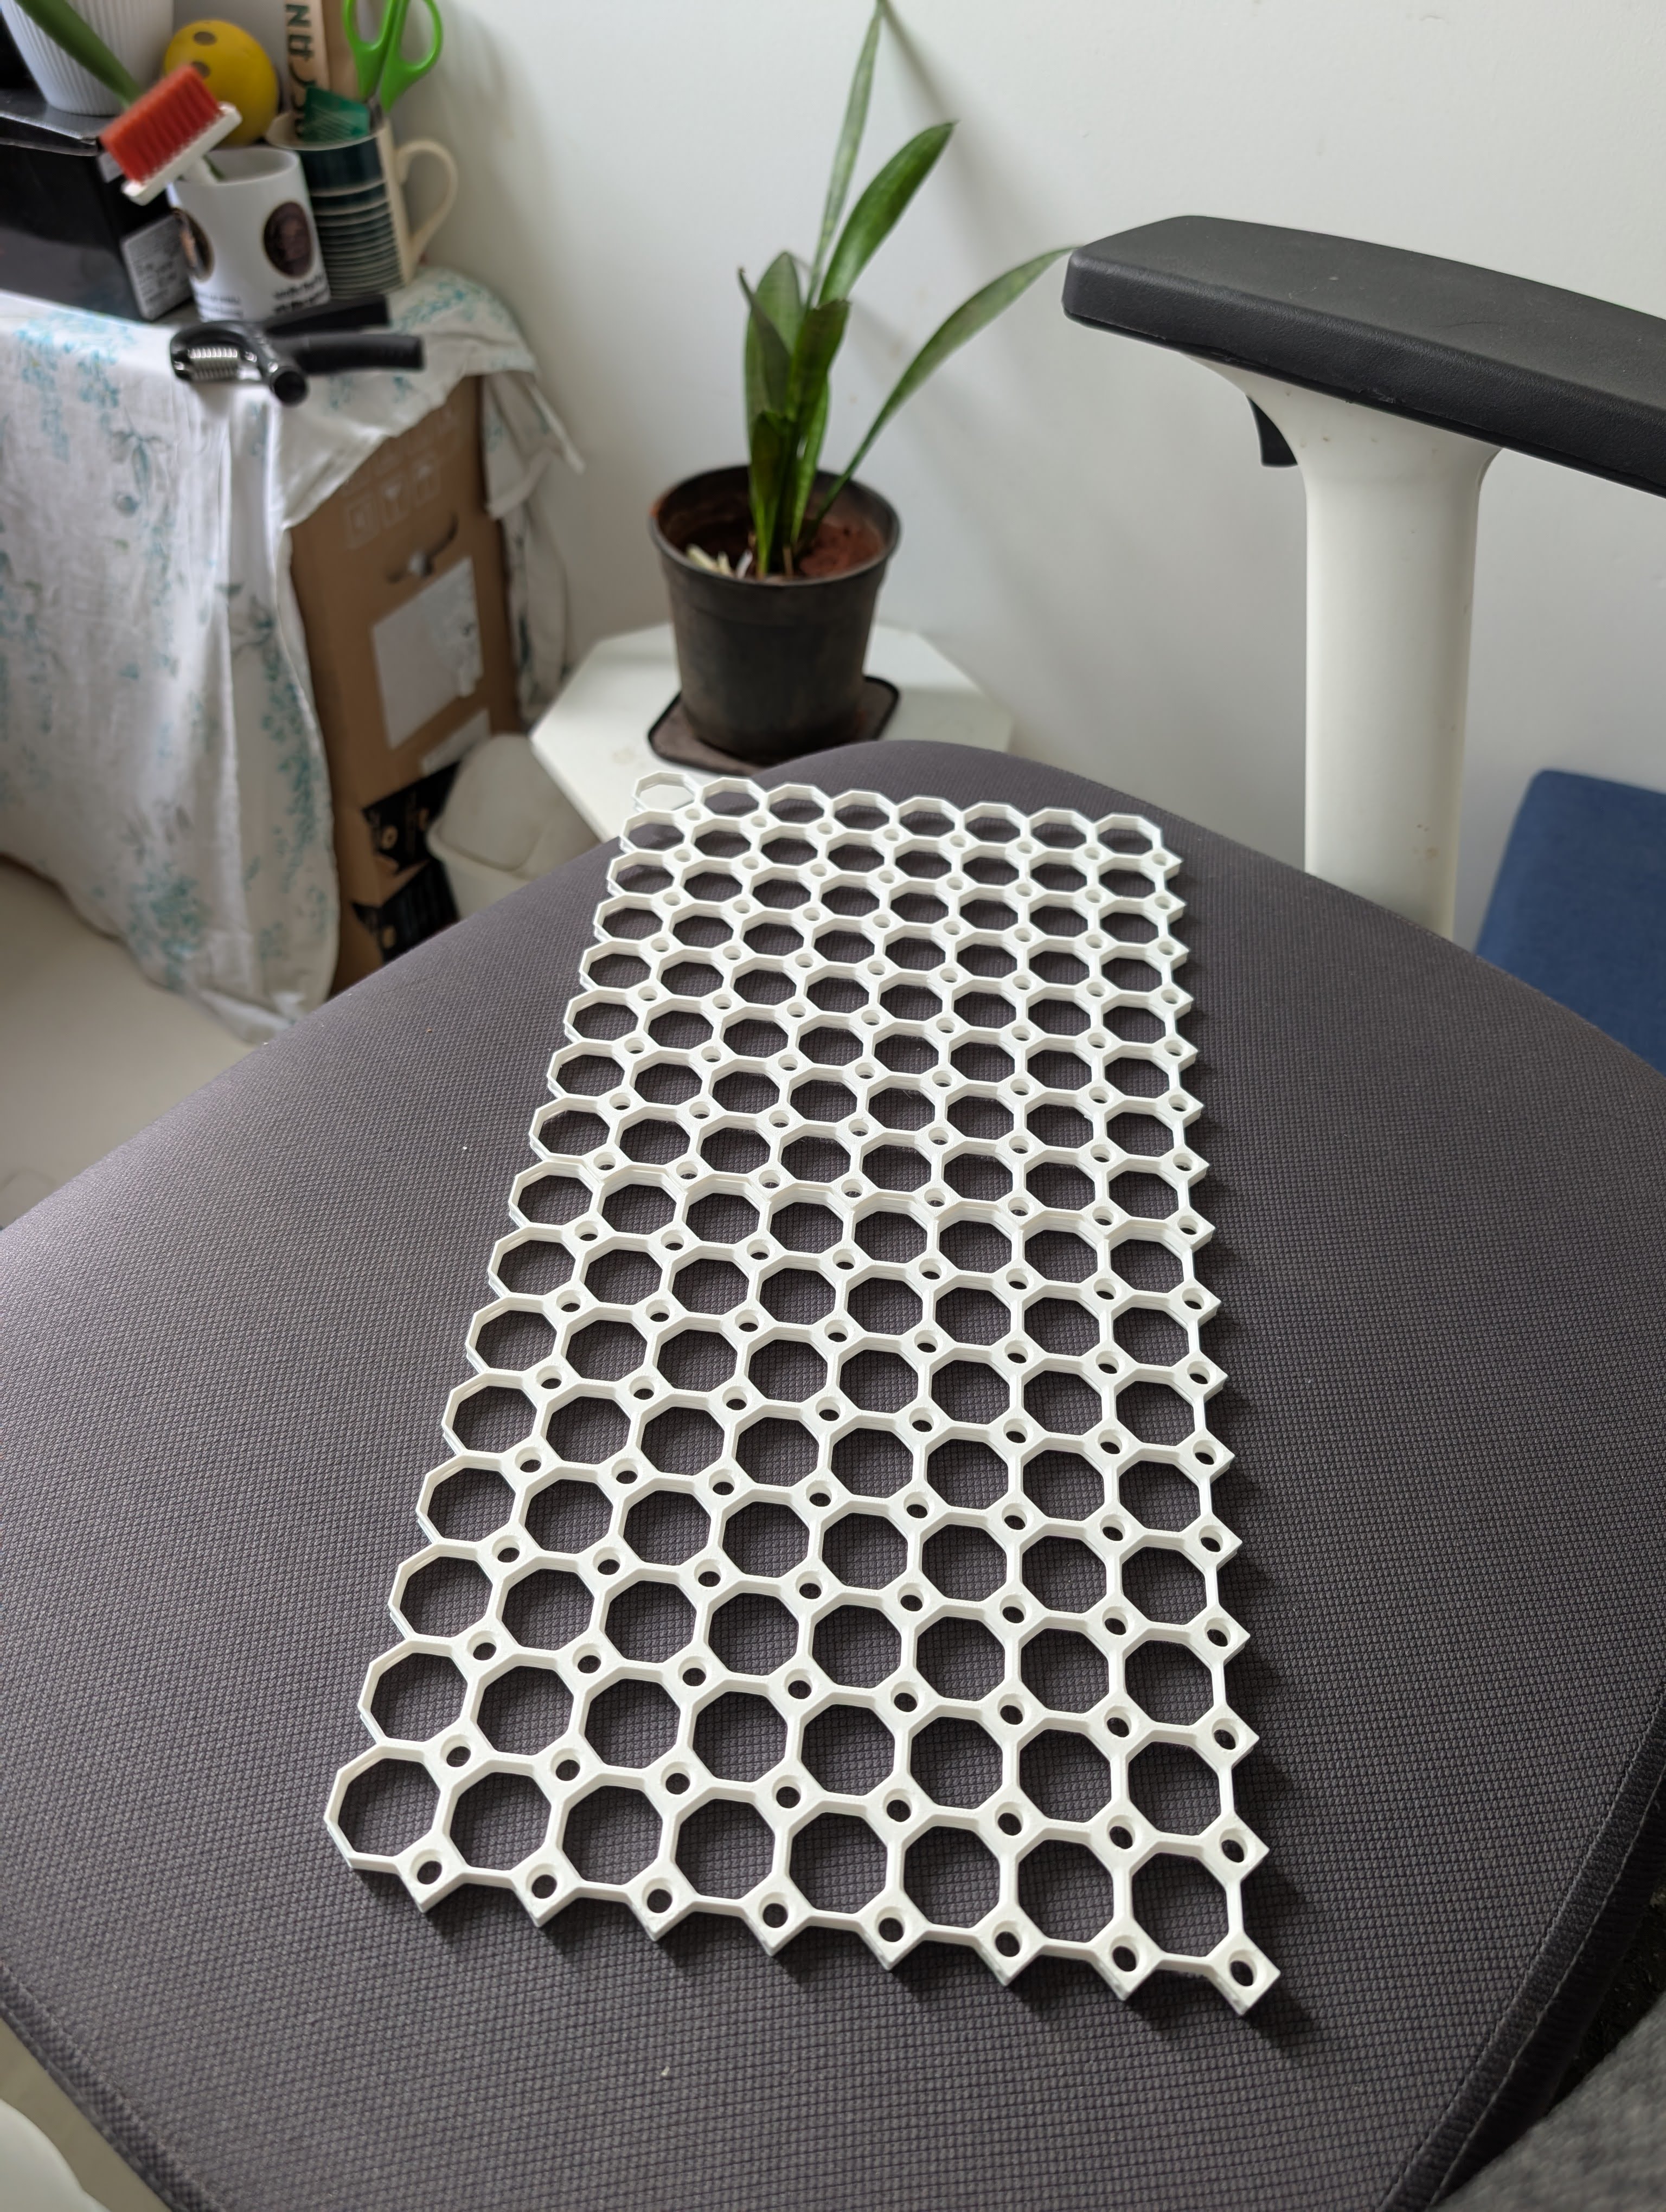
The very first tile fresh off the plate. The dimensional accuracy of modern high-speed printers makes these intricate internal bridges print effortlessly.
The tolerances were spot-on: the walls were crisp, the internal bevels were clean, and there wasn't a hint of corner lifting. Once the first tile succeeded, the printer ran nonstop for the next 48 hours.
Act II: The Snap Factory & Bench Assembly
A set of loose tiles doesn't make a pegboard. The magic of Multiboard lies in the Snaps — small, tightly toleranced connector clips that push into adjacent tile pockets and lock them into a monolithic sheet.
For maximum visual contrast and rigidity, I switched to matte black filament for all connectors, brackets, and snaps.
Here is the Bambu A1 printing a full plate of black dual and quad snaps:
Printing a full plate of black dual and quad snaps to bridge the tiles.
With a desk full of fresh tiles, snaps, and tools, assembly began:
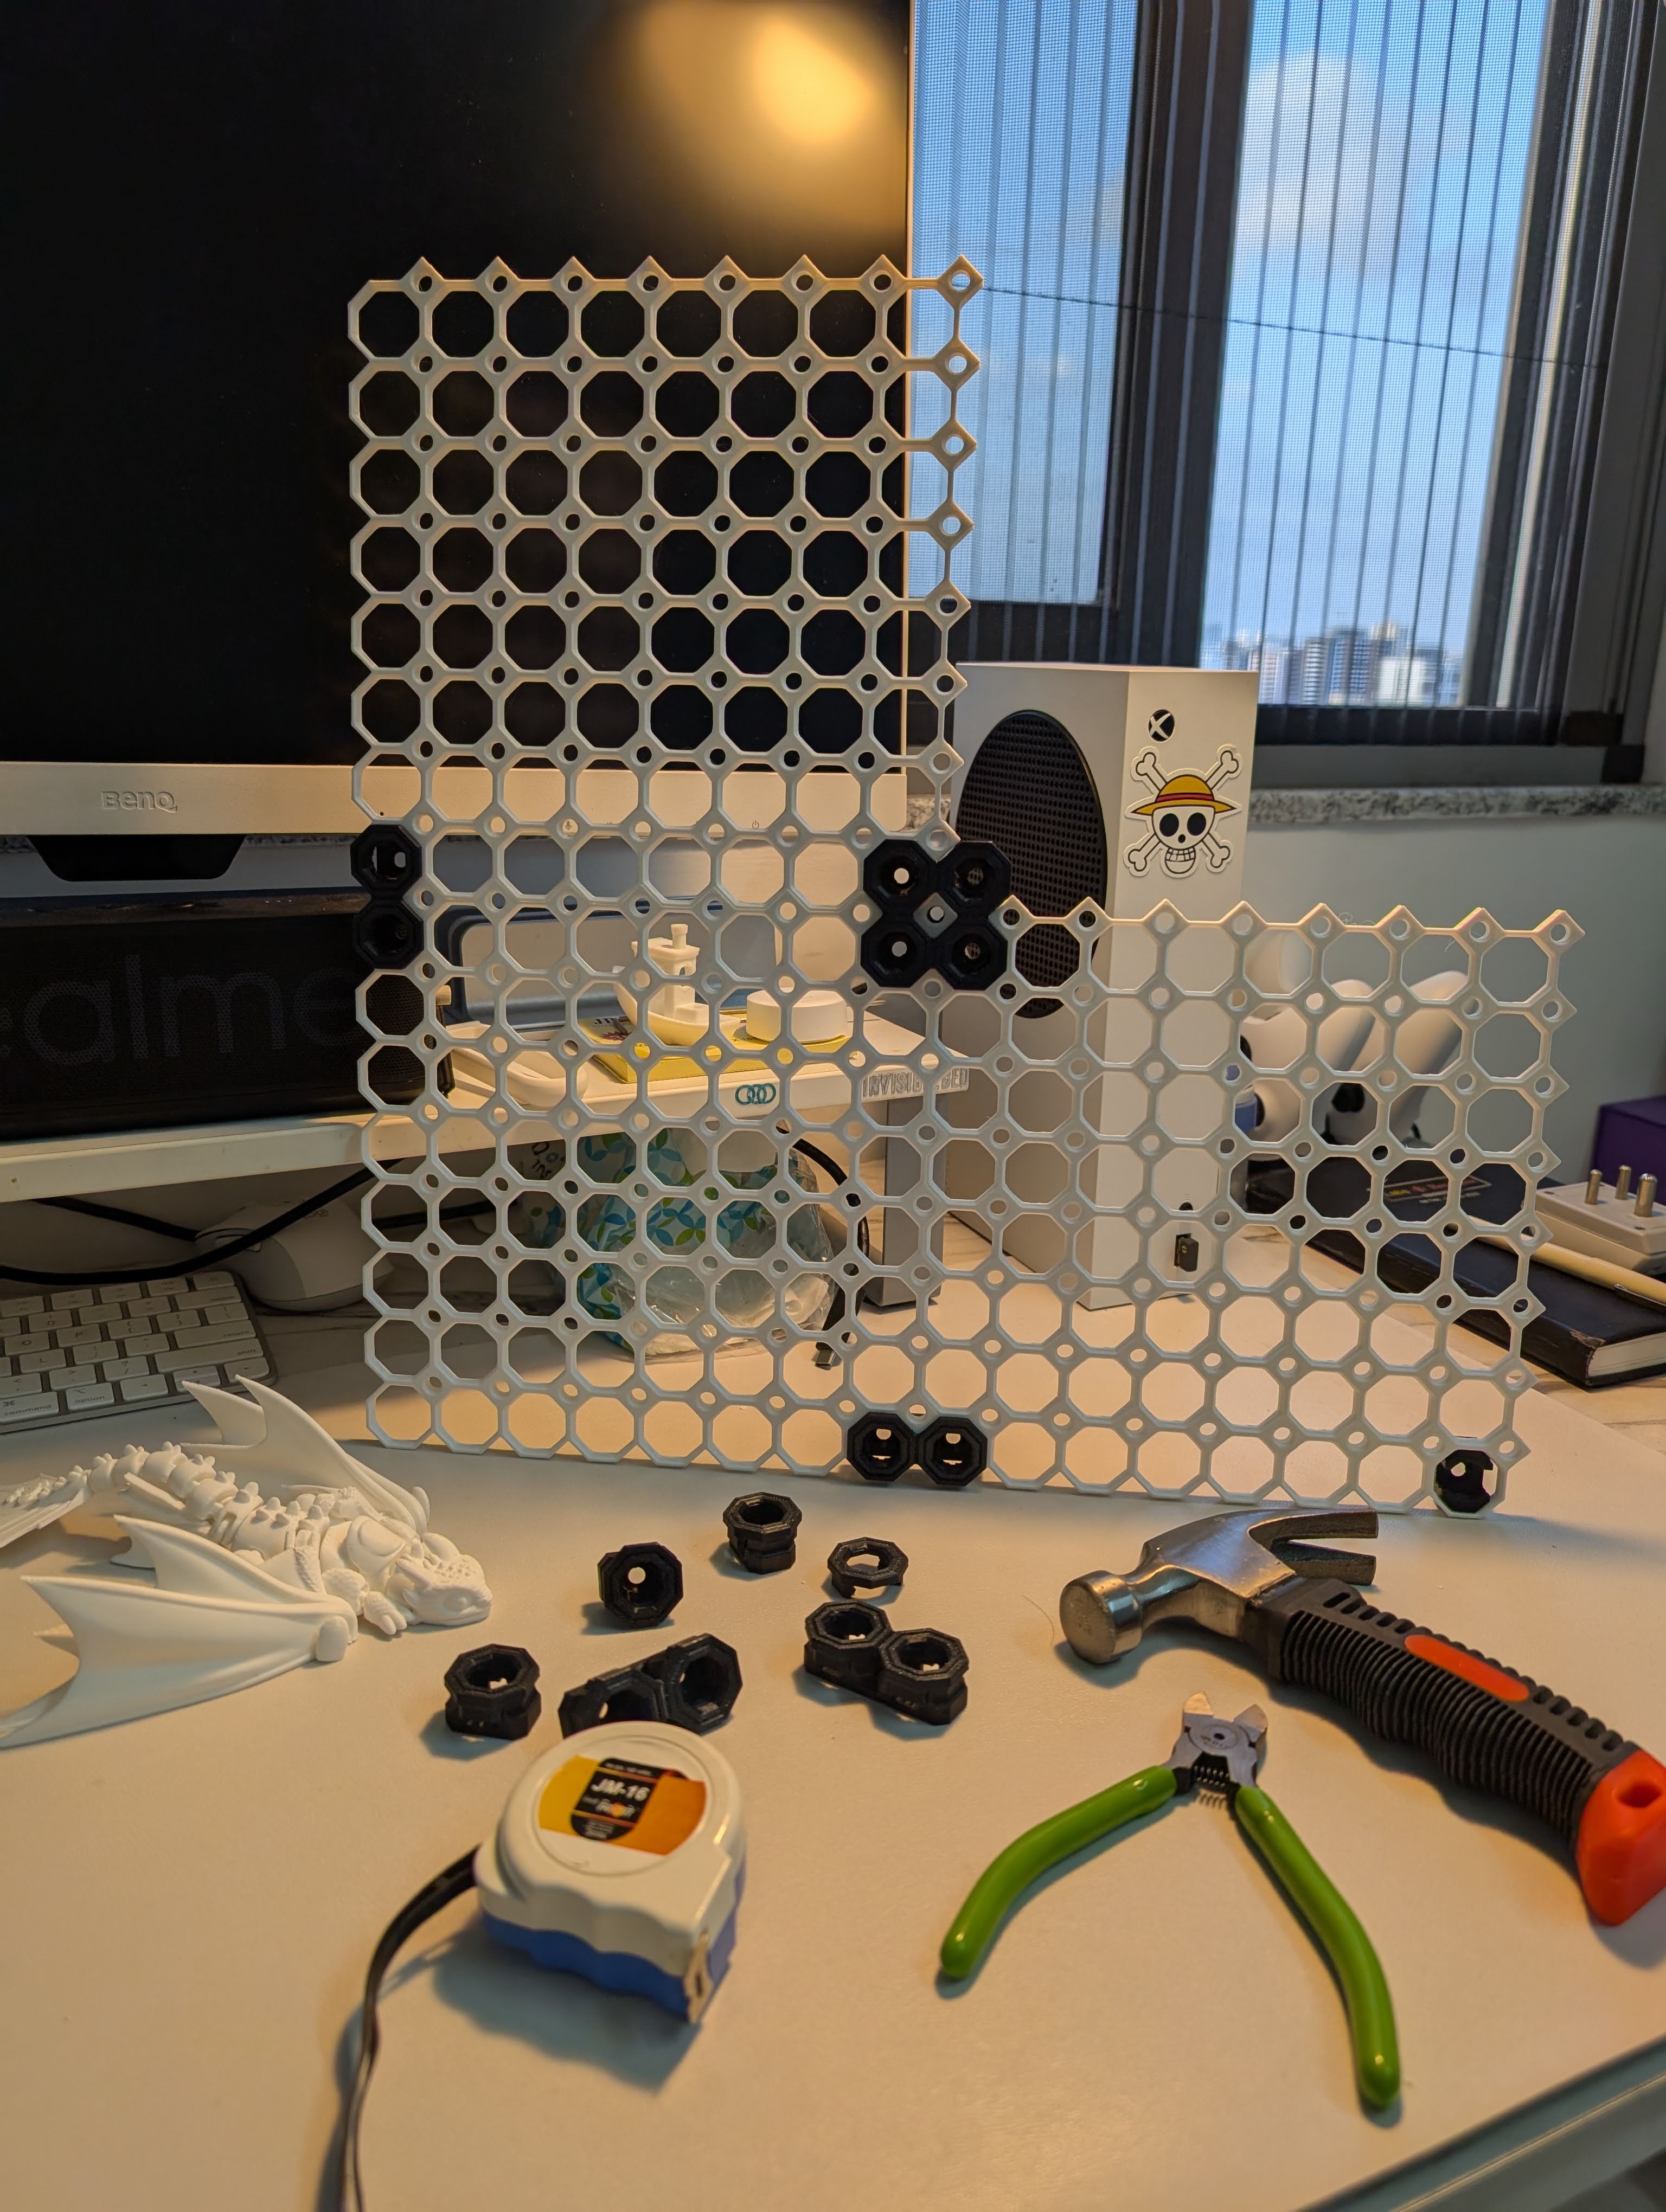
Pre-assembling tiles on the desk. You push the black snaps into the mating pockets between neighboring panels.
Pushing the snaps in requires firm, even pressure. A small rubber-faced mallet or a gentle tap with a hammer seats them with a resounding, satisfying click:
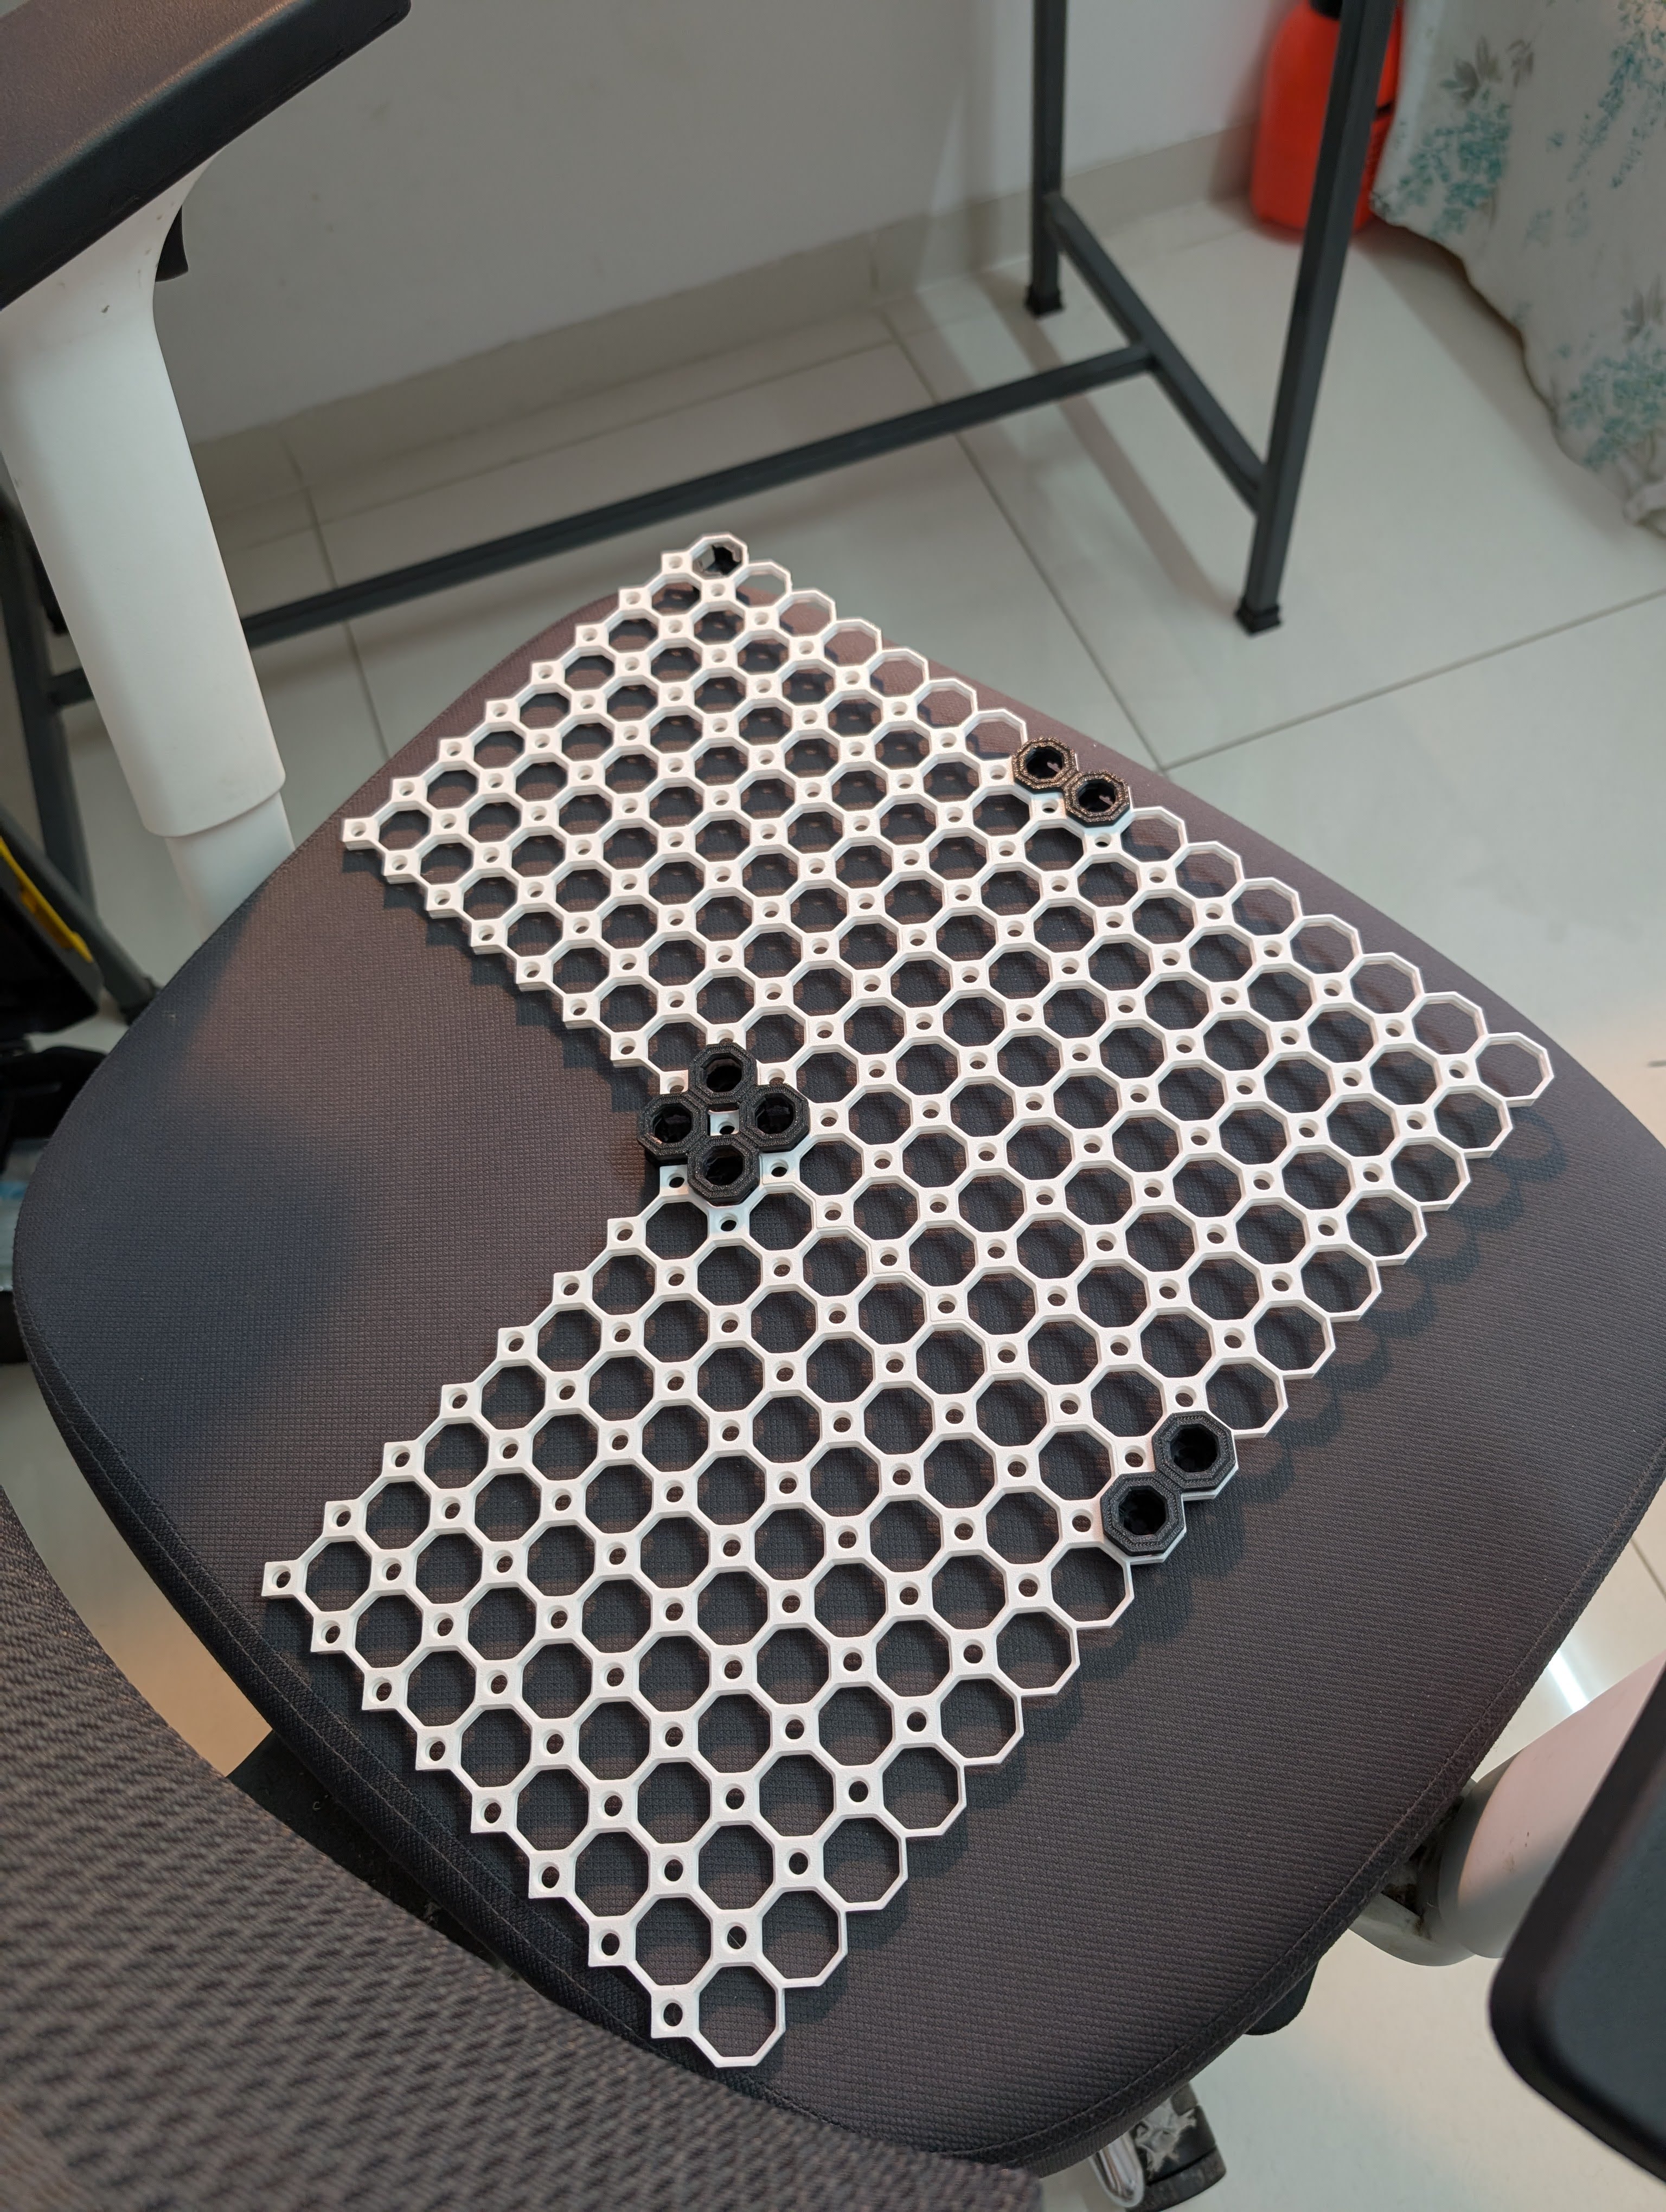
Close-up of the interlocking black snaps. The four-way quad snap in the center binds the corners together with immense shear strength.
Tile by tile, the individual pieces locked into a seamless grid:
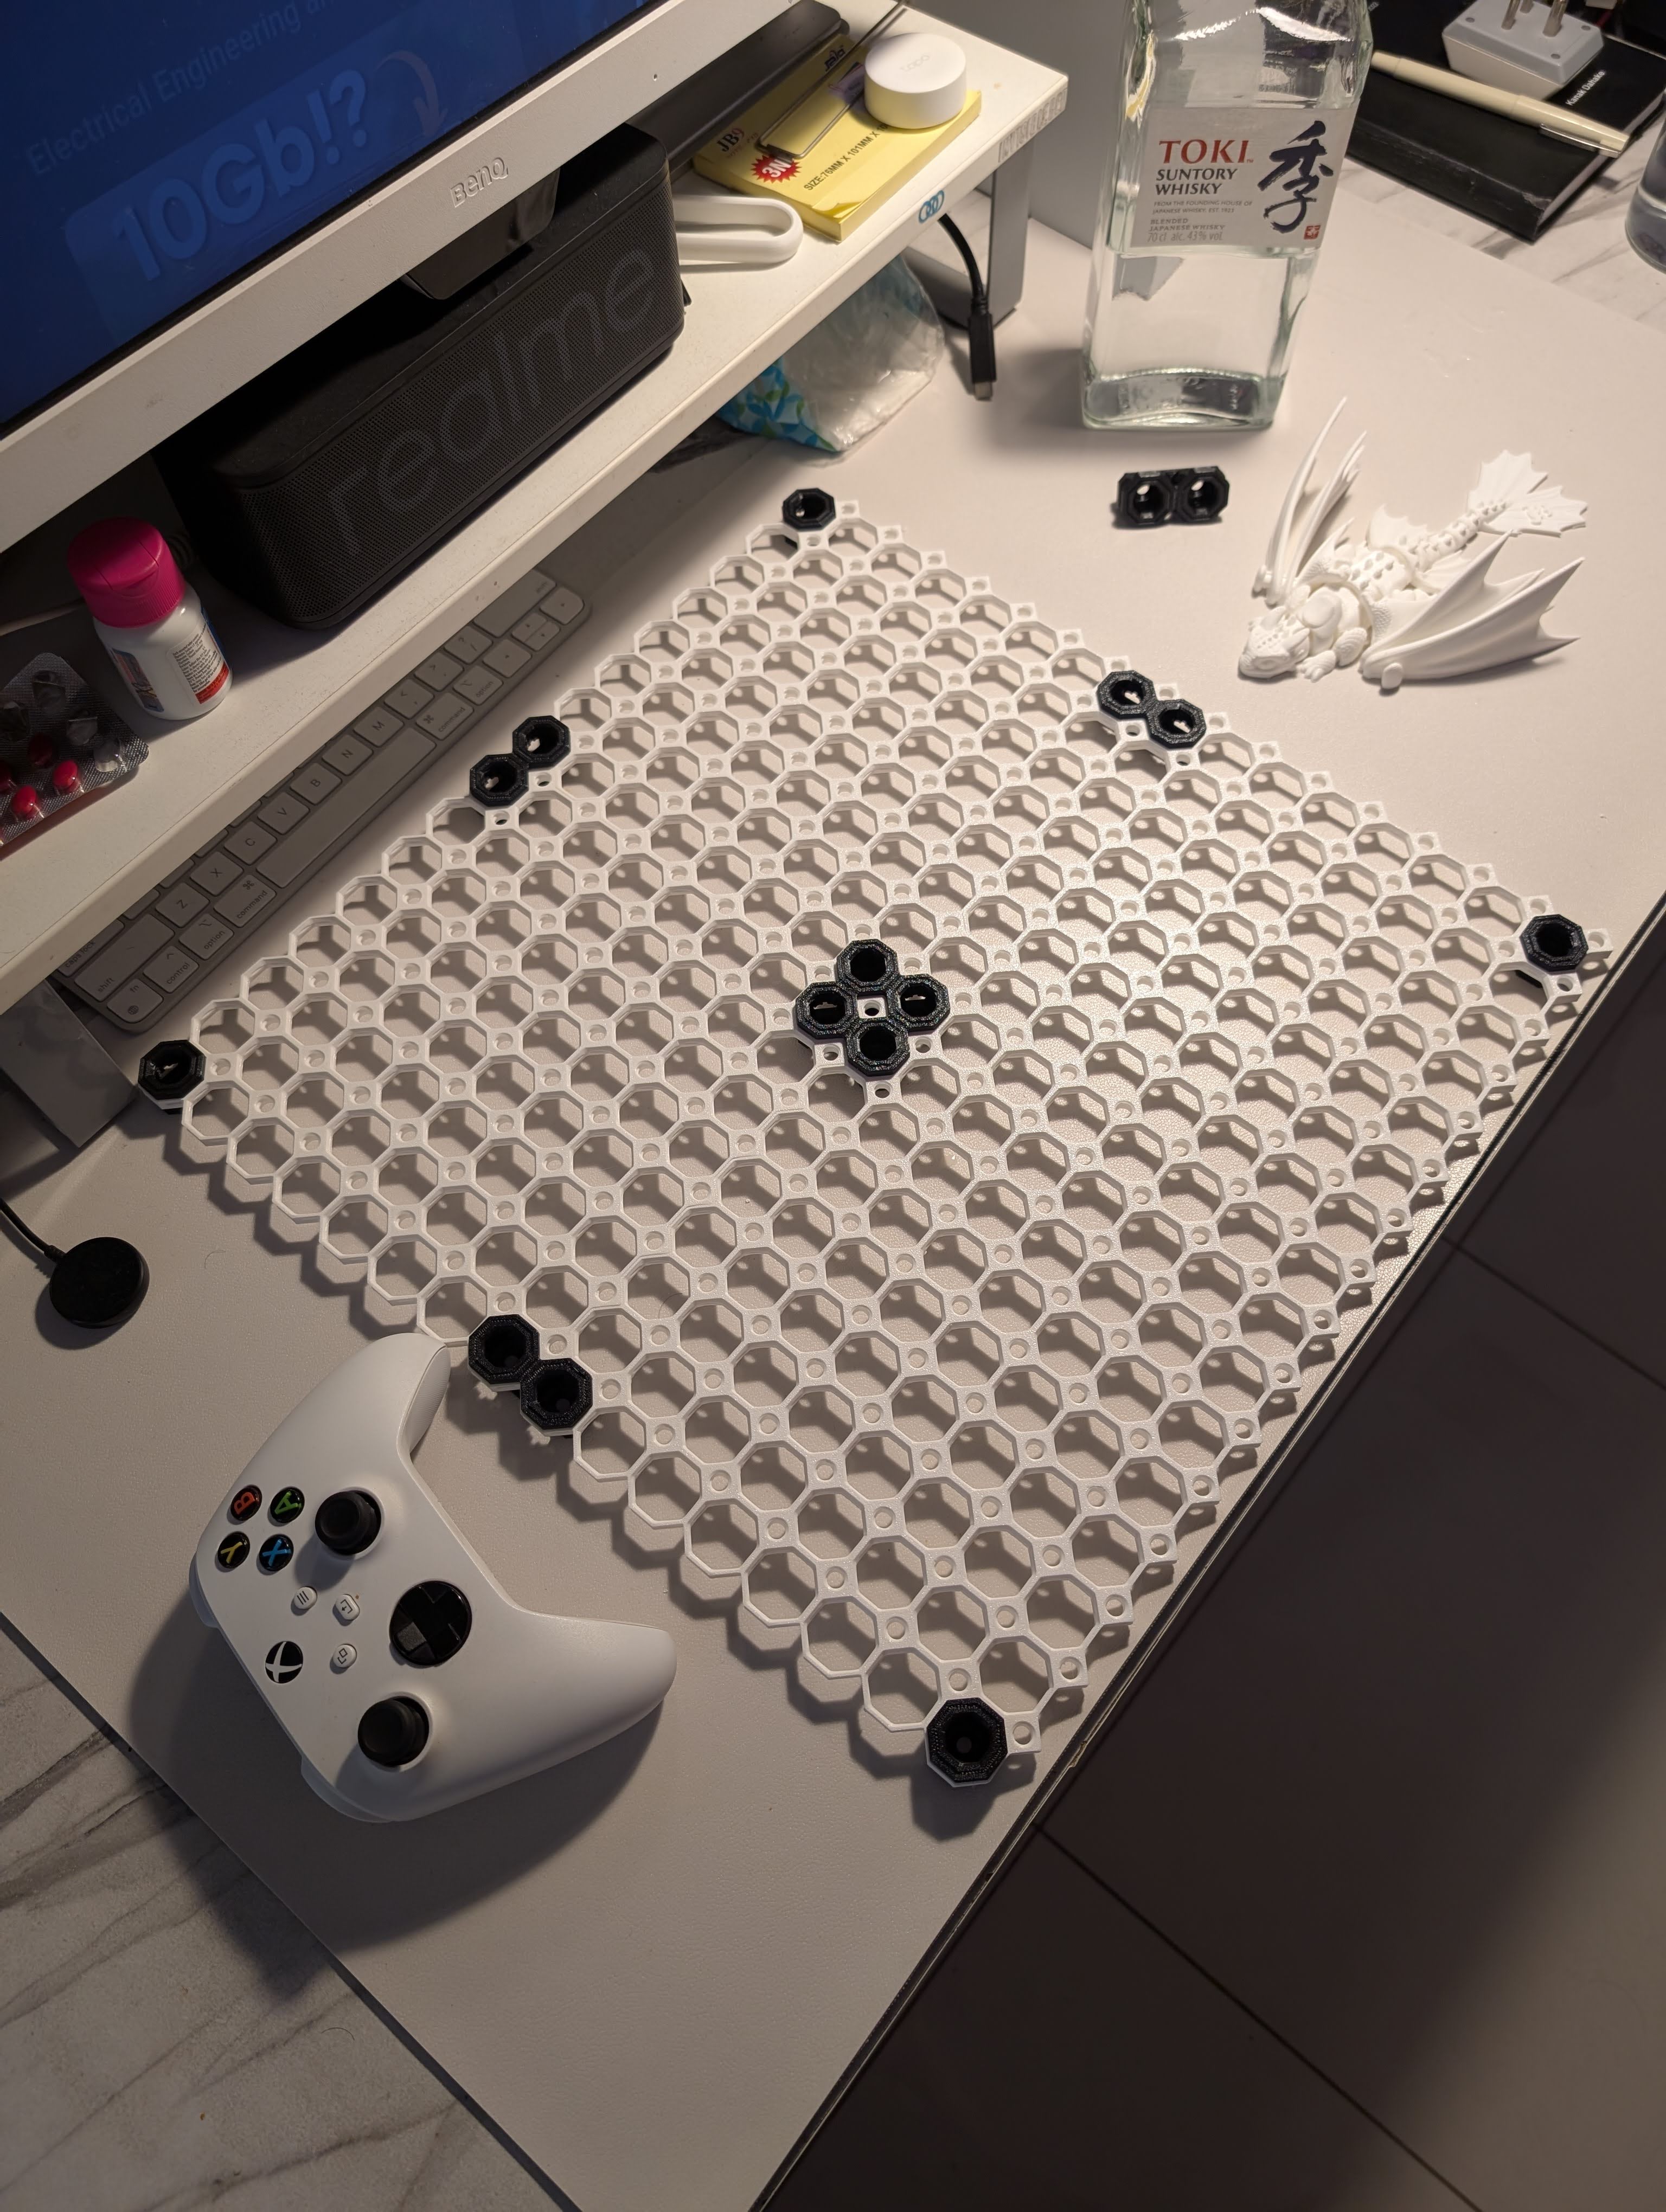
The full multi-tile grid assembled flat on the desk. Zero seam wobble, completely rigid.
Once assembled, the entire grid felt like a single injection-molded panel. You can lift it by a single corner and the whole frame stays completely rigid without flexing:
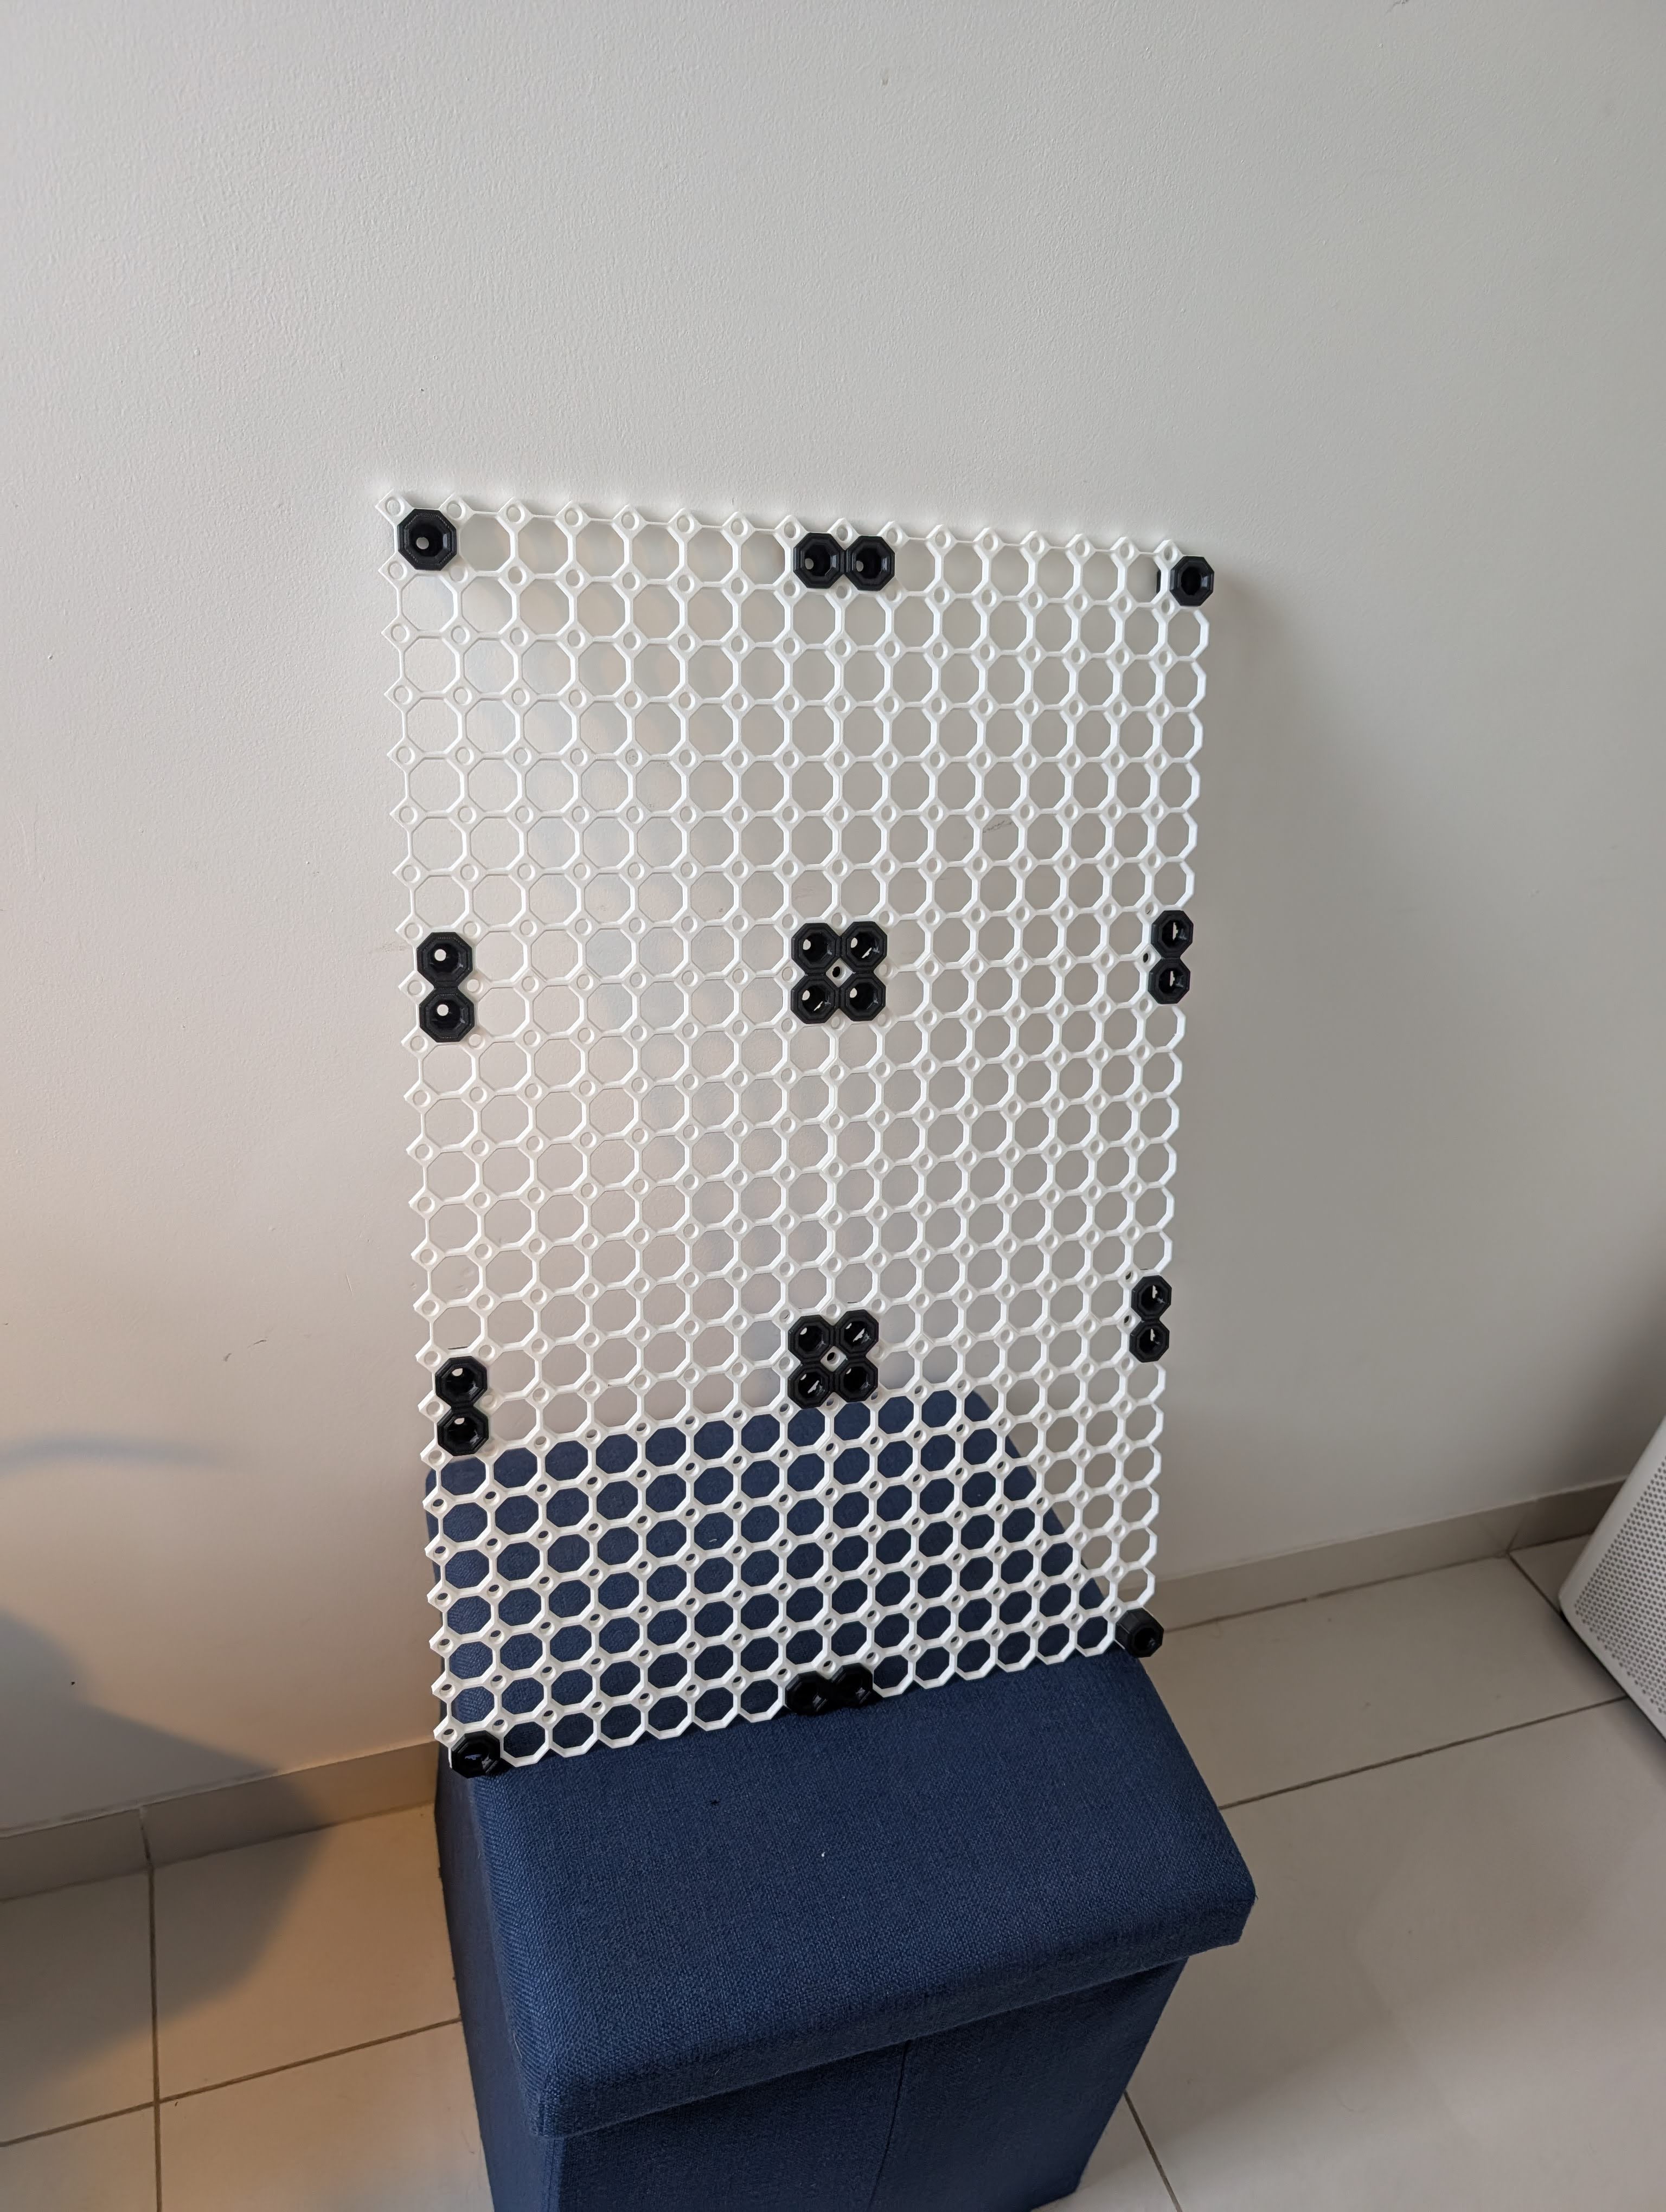
Standing upright and ready for wall mounting. The floating grid is surprisingly lightweight yet incredibly stiff.
Act III: Mounting to the Wall
Next came wall mounting. Multiboard provides modular wall-anchor clips that push into the snap pockets and accept standard wall screws or heavy-duty anchors.
Once leveled and screwed into the drywall, dead vertical wall space instantly transformed into an active, modular playground:
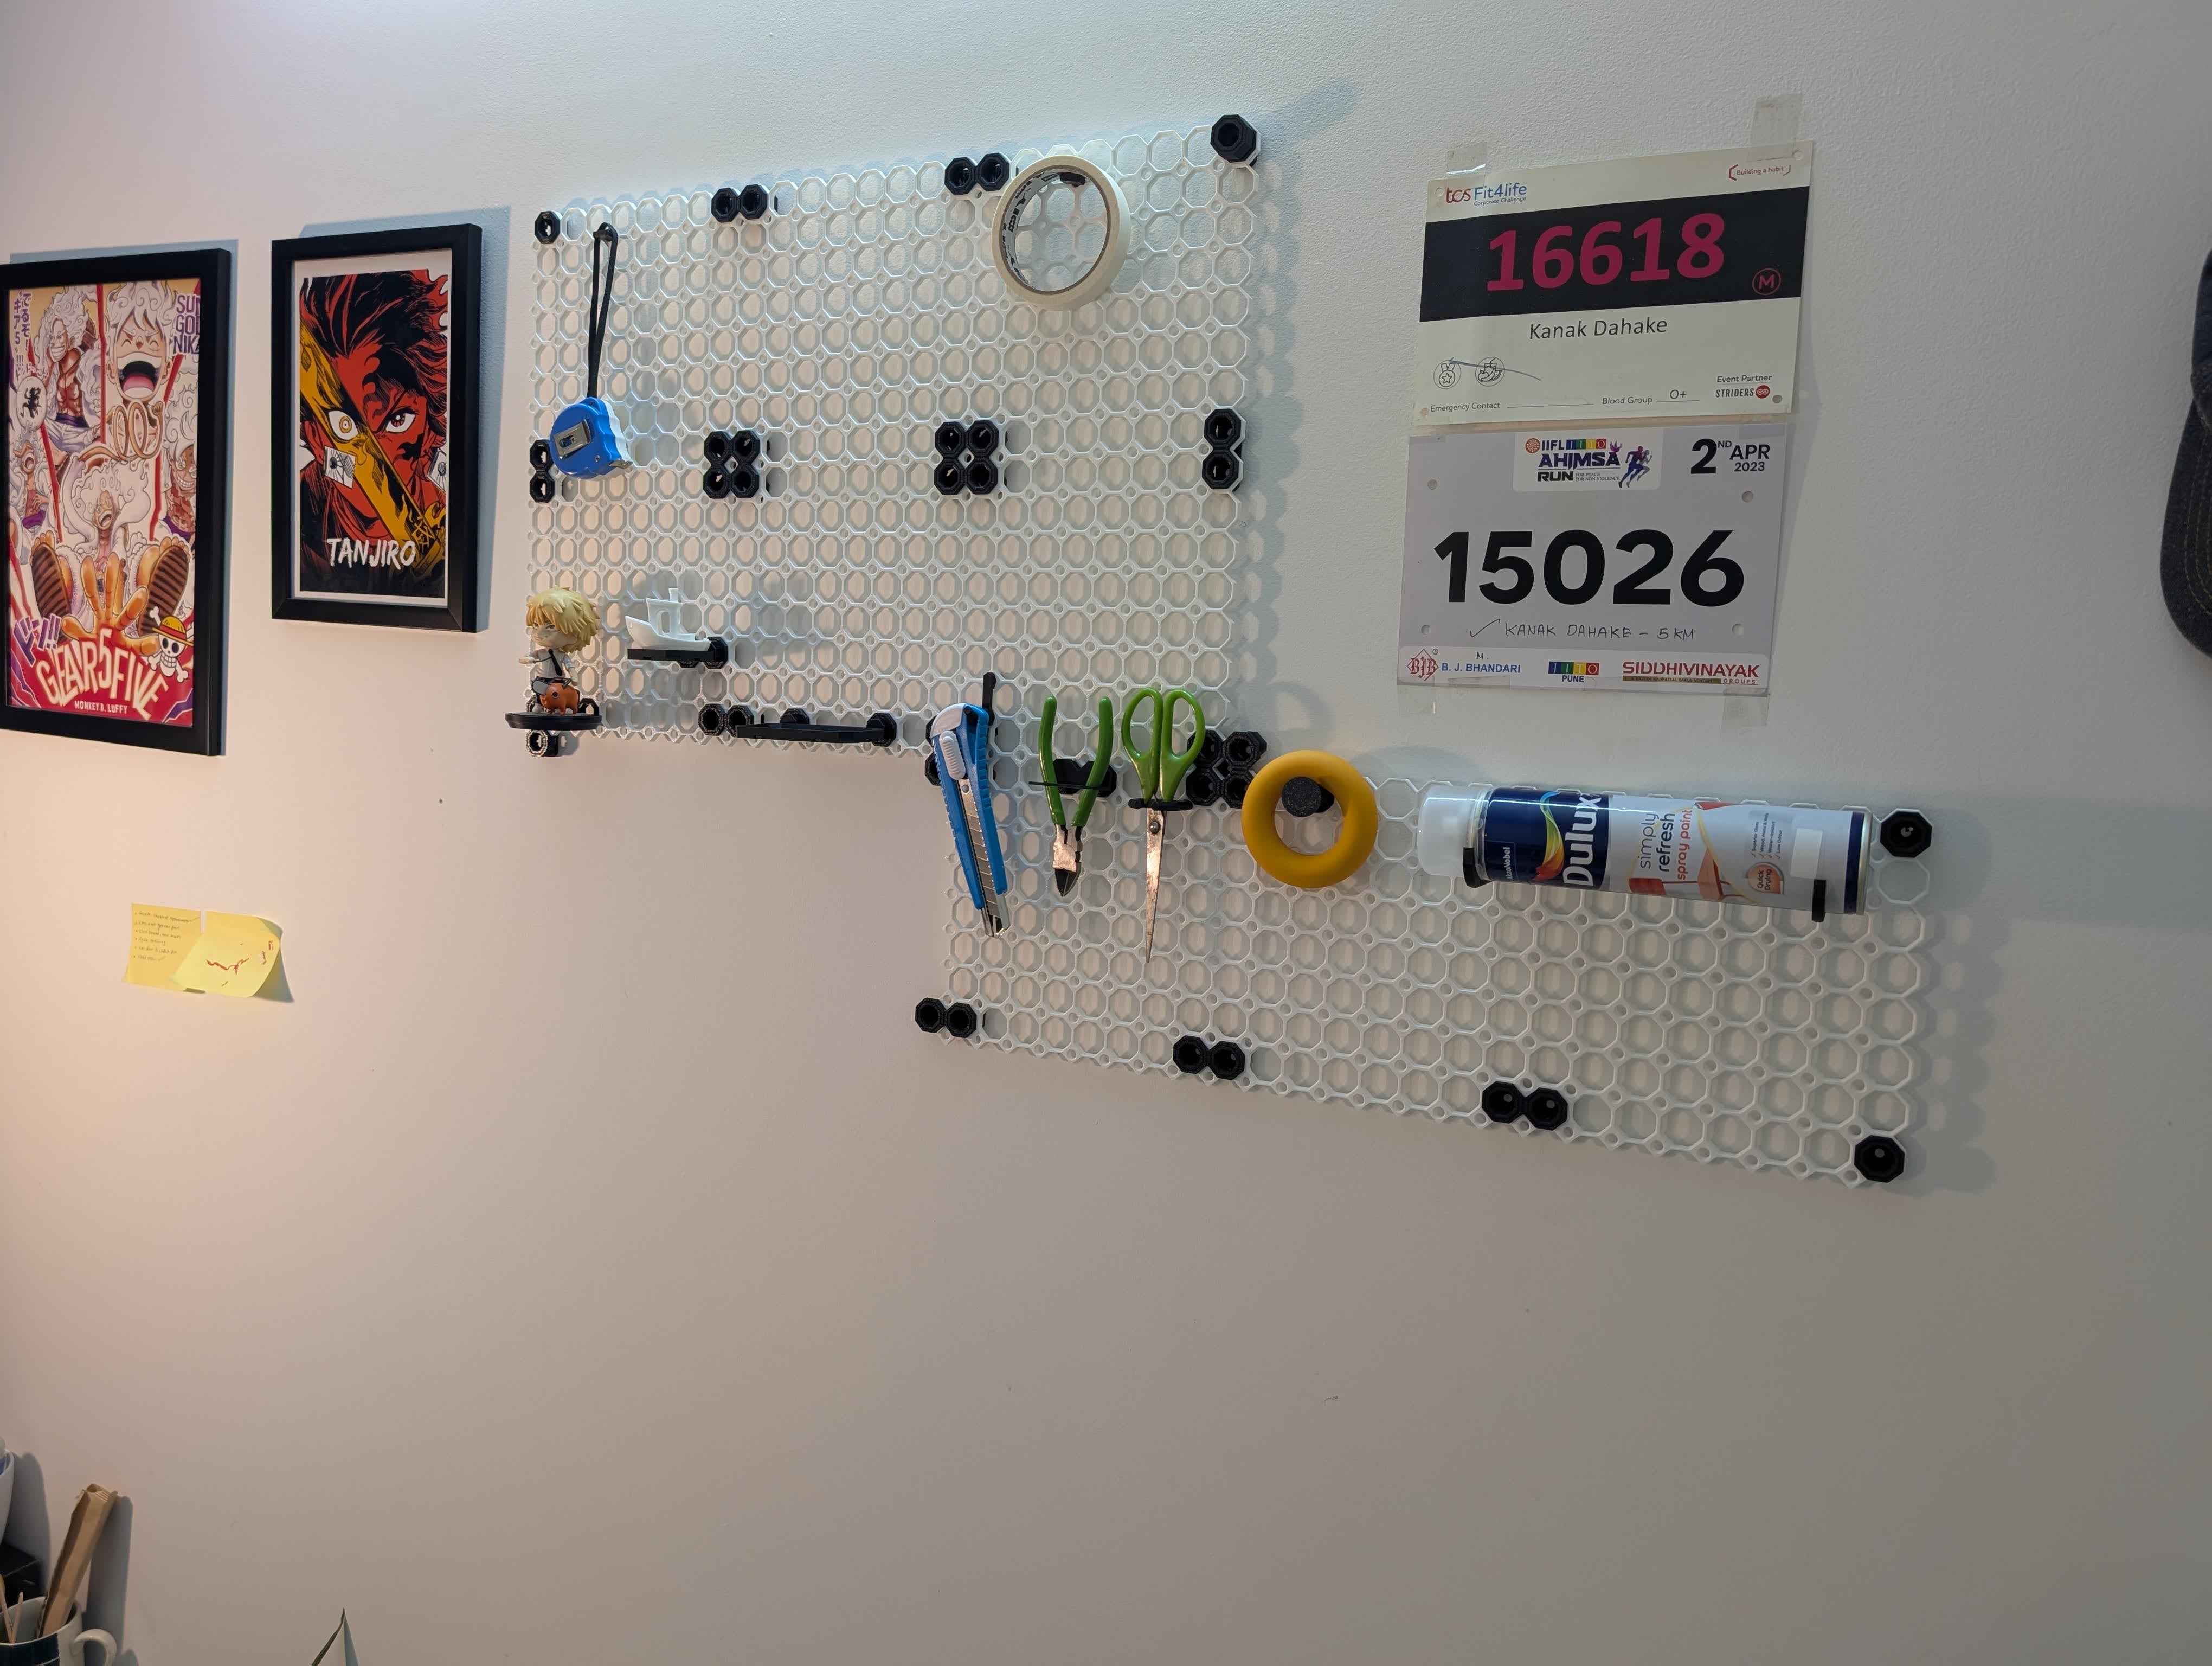
The initial mount: flush cutters, precision shears, utility knife, rolls of tape, a Dulux spray can holster, and my half-marathon bibs.
Immediately, the most frequently grabbed workbench tools found dedicated perches:
- Precision wire cutters and diagonal flush cutters held by snap-in tool holsters.
- Heavy-duty utility knife slotted into a friction-fit vertical sheath.
- Rolls of masking and electrical tape resting on friction pegs.
- A circular mounting cradle holding a can of Dulux spray paint horizontally.
Act IV: Drop-in Bins & Custom Tool Mounts
A tool wall is only as good as its micro-organization. The next print batch was dedicated to modular storage bins and tool-specific brackets:
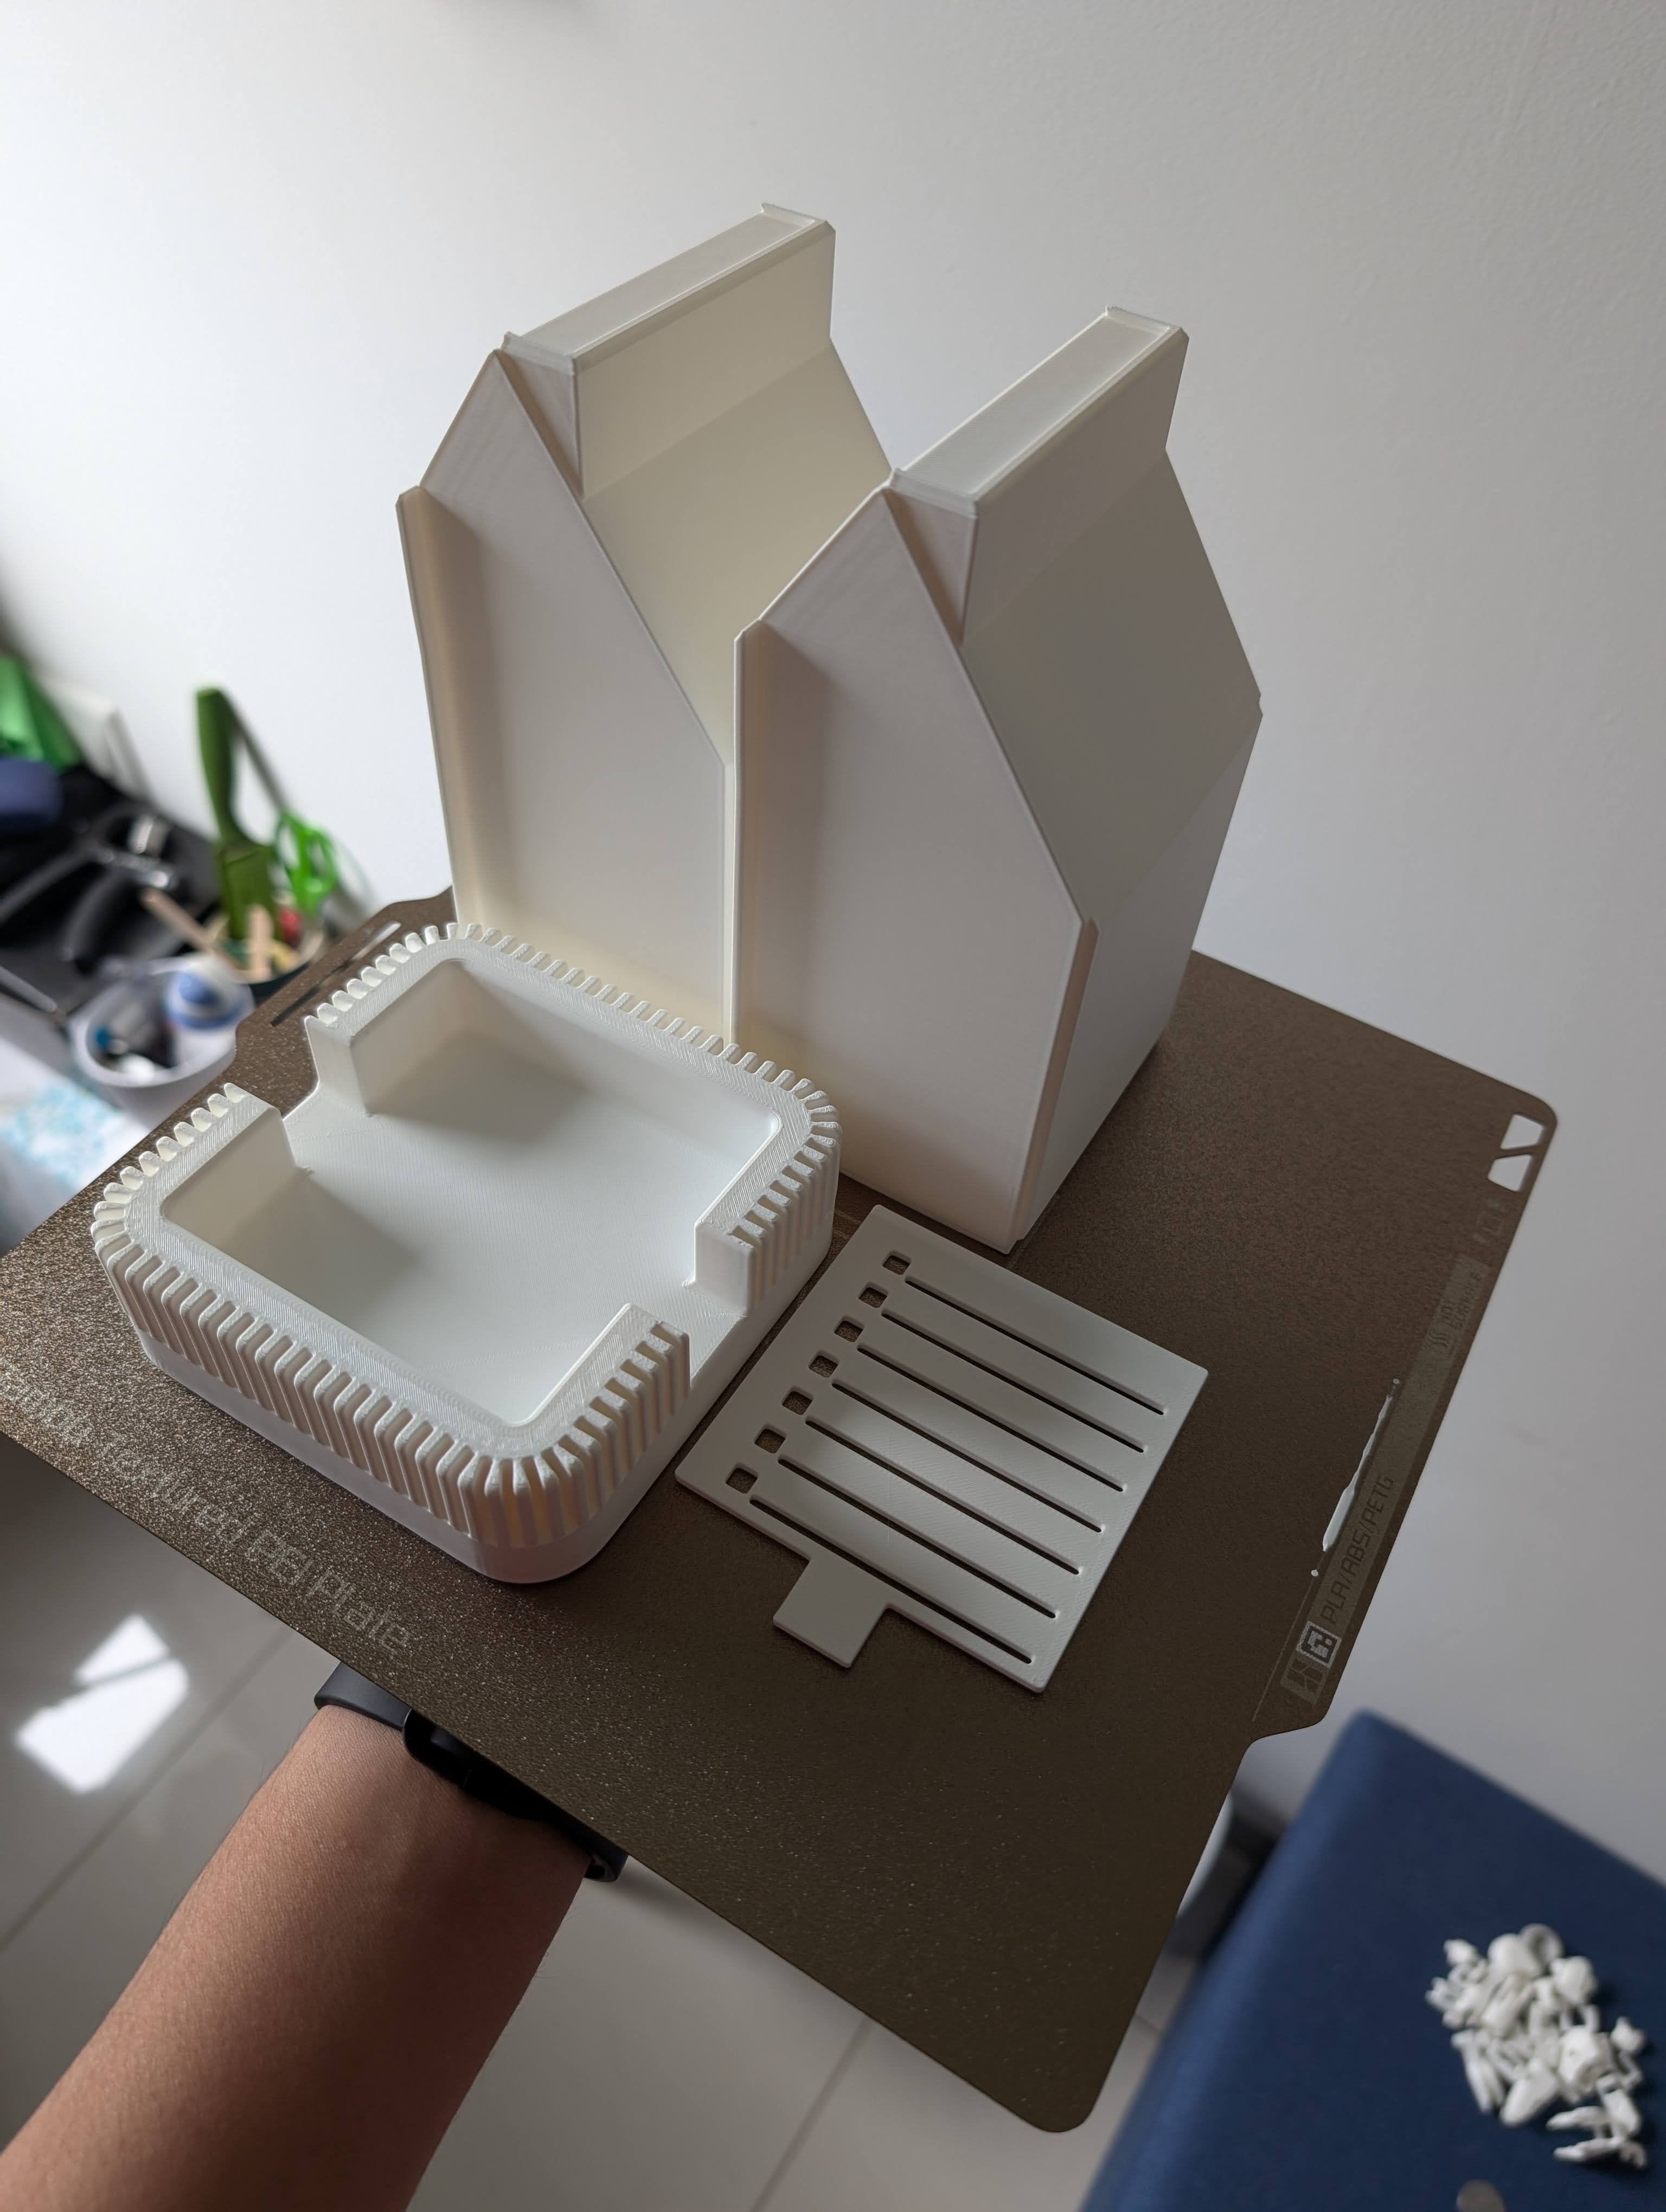
Fresh batch of modular parts bins and slide-rail brackets coming off the textured PEI plate.
These bins feature angled front lips for easy scooping and interlocking rear tabs that slide directly into the bottom row of the Multiboard.
They swallow all the tiny workbench clutter that usually gets lost in drawers:
- M2 and M3 machine screws, hex nuts, and brass heat-set inserts.
- Spare 3D printer nozzles, PTFE tube couplers, and silicon socks.
- MicroSD card adapters, flash drives, and deburring blades.
The Gravity-Lock Hammer Mount
When organizing the workbench, you don't always have to design holders from scratch. When I needed a secure way to hang my rubber-grip claw hammer, I found an ingenious gravity-lock mount by creator Jchan161 on MakerWorld (Model #795607).
It cradles the hammer head securely while letting you lift it straight up with zero friction.
The Personal Touches
Alongside functional tools, the Multiboard doubles as a display gallery for my favorite hobby prints:
- Articulated T13 Mech Figure: Standing guard on a printed mini-shelf.
- Space Shuttle Launch Scene: Rocket plume printed in white infill acting as a display pedestal.
- Custom KANAKJR Nameplate: Extruded dual-color desk typography commanding the top left corner.
- Demon Slayer Tanjiro Art: Framed print mounted right alongside the wall.
- Articulated Dragon & Low-Poly Alpaca: Posed on custom shelf brackets.
Act V: The Connected Workspace
This Multiboard wall isn’t an isolated project — it sits at the heart of an interconnected smart maker ecosystem.
Here is a quick tour of the workspace in action:
Workspace tour: 3D printed articulated iPad arm for CAD drawings, Home Assistant dashboard tracking the Bambu A1 live, the Multiboard wall, and the printer running on the side.
Notice how everything talks to each other:
- Articulated iPad Arm: A fully 3D printed desk-clamped arm holds my iPad displaying CAD assembly diagrams and print schematics right at eye level.
- Home Assistant "Printo: Bambu A1": My wall monitor runs a live Home Assistant dashboard displaying real-time nozzle temperature (220°C), bed temperature (65°C), layer count, remaining print time, and total desk power draw.
- CCTV Stream: A small camera perched on the wire rack streams the print bed directly into the dashboard and alerts me if anything fails.
- The Multiboard Wall: Located right beside the desk so every tool is exactly an arm's reach away.
The Verdict
Building a Multiboard wall as my first major 3D printing project was the single best decision I made as a beginner maker.
Instead of letting a 3D printer sit idle waiting for occasional novelty prints, it forced me to dial in dimensional tolerances, master multi-part assemblies, understand structural strength, and permanently solve workspace clutter.
Every time I reach out to grab a pair of cutters, swap a nozzle, or snap in a new holder, I'm reminded: the tool made the project, and the project makes every future build better.
Want to see more things I've built on the Bambu A1? Explore the 3D Prints Gallery or check out the AMS Lite Top Mount & Dry Enclosure build.